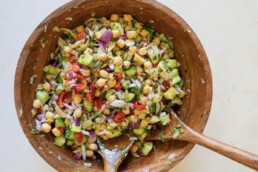
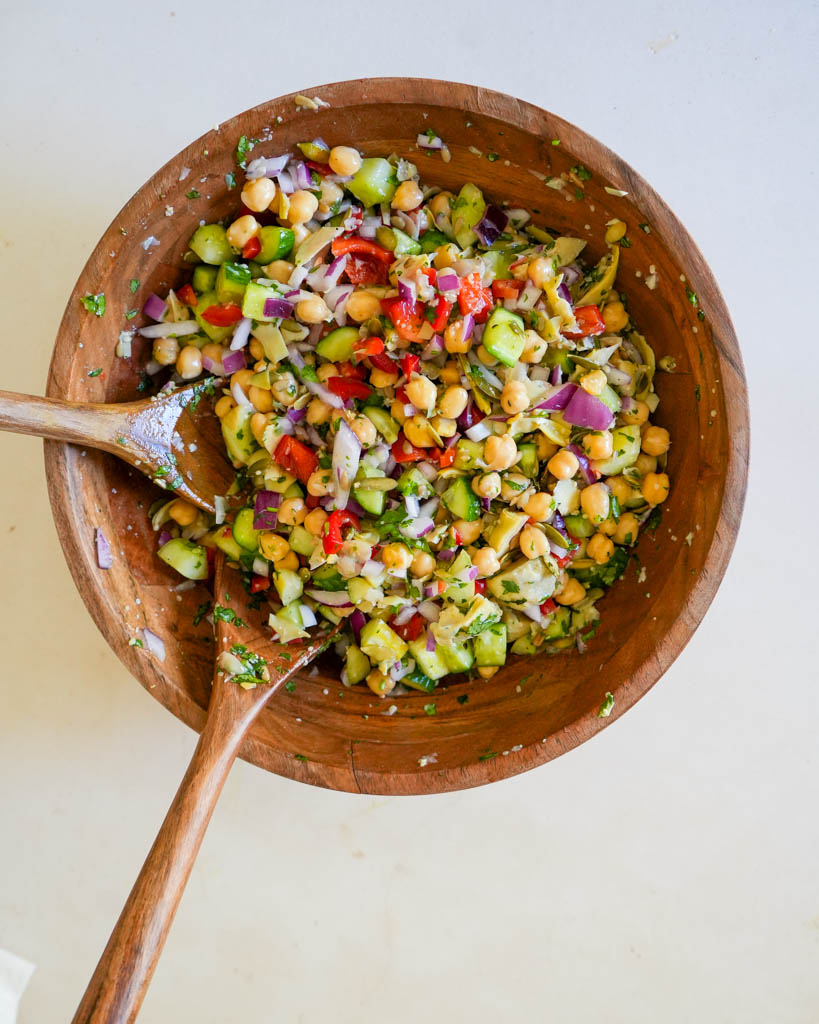
Easy High Fiber Salad Ready in Minutes!
This High-Fiber Salad is perfect when you are looking for a quick, filling meal packed with good-for-you nutrients. Not only is it high in fiber, but its also loaded with plant-based protein, antioxidants, and healthy fats that help improve digestion, gut health, and heart health.

Fiber is the key to gut health and is your gut's best friend! It moves through your digestive system, picking up all the junk and making sure everything runs smoothly. This means fewer stomach troubles and a happier you!
Here are some of the key benefits of this High-Fiber Salad:
- Perfect For Lunch! You can enjoy it midday without the post-meal crash. Fiber slows down the absorption of sugar, giving you steady energy throughout the day. No more sugar crashes or mid-afternoon slumps.
- Keeps You Full, Which Means Less Snacking. Fiber adds bulk to your meals, helping you feel satisfied and less likely to reach for those extra snacks. Plus, it’s super helpful if you want to maintain a healthy weight.
- Improves Gut Health. Your gut is home to trillions of good bacteria that love fiber. When you feed them fiber, they produce substances that keep your gut lining healthy and happy. A happy gut means a happier you!
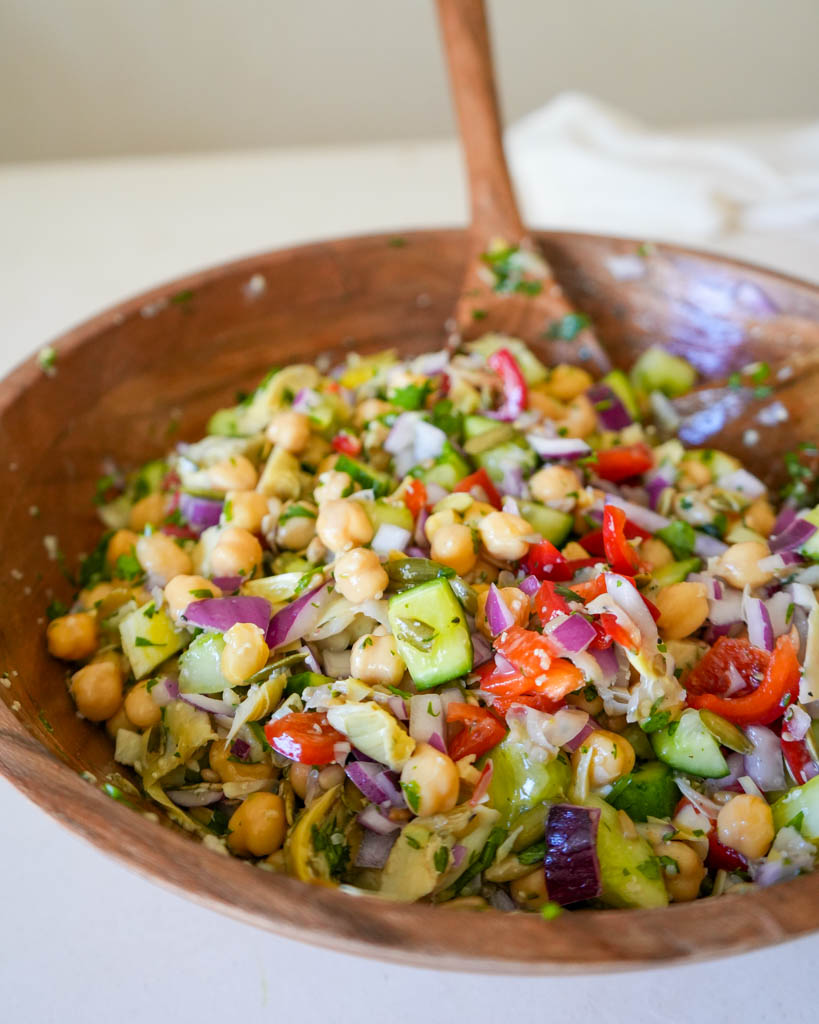
I love this salad because it is not your typical leafy-green boring salad AND it is easy to throw together with some pantry staples and a few fresh herbs and vegetables. It's also perfect for meal prep because the longer the salad sits in the homemade citrus vinaigrette, the better it tastes.
Ingredients You'll Need
- Cucumber: Use 1 large cucumber or 2-3 Persian cucumbers. Have high water content, which helps to keep you hydrated
- Red Onion: Raw red onion is especially high in fiber and also contains antifungal agents that help fight off harmful bacteria in the body
- Red Pepper: Red peppers are packed with antioxidants, particularly vitamin C and beta-carotene, that help reduce inflammation in the gut, protecting the digestive tract from oxidative stress and potential damage.
- Chickpeas: A great source of plant-based protein and are high in fiber and healthy fats. It is a great meat replacement and bulks up the salad.
- Fresh Herbs: Parsley and Cilantro are both incredibly high in vitamin A, folate, vitamin K, iron, and vitamin C. Not only do they add a vibrant flavor to the salad but the vitamin content helps detox the body and improve brain function.
- Super Seeds: Hemp Seeds, Pumpkin Seeds, and Sunflower Seeds are a great source of protein and omega-3 and omega-6. These heart-healthy seeds add crunch to the salad.
The dressing for the salad is a simple lemon-lime vinaigrette that enhances the flavor and the freshness of the ingredients. It is easy to whip up in minutes!
Storage and Meal Prep Option
This salad lasts in the fridge for up to 3 days in an airtight container. It is great for meal prep. You can divide it into equal portions and store it in mason jars for an easy grab-and-go lunch.
Quick and Easy High-Fiber Salad

This High-Fiber Salad is perfect when you are looking for a quick, filling meal packed with good-for-you nutrients. Not only is it high in fiber, but this salad is loaded with plant-based protein, antioxidants, and healthy fats that help improve digestion, gut health, and heart health.
- 1 large cucumber (or 2-3 Persian cucumbers)
- 1 red onion
- 1 red pepper
- 2 16oz can chickpeas, rinsed and drained
- 8 oz marinated artichoke, drained and cut into pieces
- 1/4 cup chopped cilantro, packed
- 1/4 cup chopped parsley, packed
- 4 tbsp Hemp Seeds
- 4 tbsp Pumpkin Seeds
- 4 tbsp Sunflower Seeds
Citrus Vinaigrette
- 1/4 cup extra virgin olive oil
- 3 tbsp fresh lemon juice
- 3 tbsp fresh lime juice
- 1 tsp dijon mustard (optional)
- 2 tbsp apple cider vinegar or red wine vinegar
- 1 tbsp honey or maple syrup (optional for a touch of sweetness)
- 1 garlic clove, minced (optional)
- salt and pepper, to taste
- Add all the ingredients for the salad into a large bowl and toss to combine
- In a small bowl, whisk together the ingredients for the dressing. Taste and adjust as desied, adding more lemon/lime for tangier dressing or honey to sweeten.
- Pour the dressing onto the salad and toss well. Enjoy!
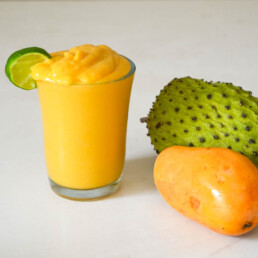
Fresh Soursop Smoothie (Guanabana Smoothie)
This Soursop Smoothie is a delicious and nutritious tropical beverage made with soursop (guanabana), mangos, and coconut milk. As vibrant and lush as it is refreshing, this soursop smoothie recipe is the drink of the summer!
If you want to try other fruit smoothie recipes, check out my Hydrating Cherry Smoothie and Cherimoya Smoothie next!

This soursop smoothie is a delicious treat that just so happens to be good for you too! I make this recipe with just 3 ingredients for a quick snack or breakfast on the go.
When it comes to taste, soursop has been compared to delicious snacks like Skittles and sorbets. It's truly nature's candy and I love the way it tastes when blended into a smoothie. Soursop smoothies are tangy, a little sweet, a bit sour, and taste amazing with tropical fruit and coconut milk.
Reasons This Soursop Smoothie Recipe Works
- Unique Flavor Combination! The blend of soursop and mango creates a unique, tropical flavor that’s both sweet and slightly tangy.
- Nutrient-Rich! Soursop is packed with vitamins and minerals, while mango adds a dose of antioxidants.
- Easy to Make! With just a few ingredients and a blender, you can whip up this smoothie in no time.


What is Soursop?
Soursop, also known as guanabana or graviola, is a fruit found in tropical climates in Africa, Southeast Asia, South America, and the Pacific Islands. They have a bumpy green skin but the flesh is white and creamy.
Soursop Smoothie Benefits
Rich in Vitamin C
Soursop contains the antioxidant Vitamin C, which supports immune health. The fruit contains 215% of the daily recommended amount so it is an excellent source for boosting immunity and protecting the body against infections. Vitamin C is also essential for the growth and repair of tissues, aiding in wound healing and the maintenance of healthy skin.
Potential to Kill Cancer Cells
Test-tube studies suggest that soursop extract may help kill cancer cells, reduce tumor size, and enhance immune system activity, particularly against prostate, breast, colorectal, and pancreatic cancers. While lab and animal studies are promising, more research is needed to determine the effects of consuming soursop in humans for cancer prevention or treatment.
Reduces Inflammation
The presence of antioxidants helps combat free radicals, which damage cells. By neutralizing these free radicals, soursop may reduce inflammation and support overall cellular health, potentially alleviating symptoms associated with chronic inflammatory conditions.
Promotes Digestion
The tropical fruit is packed with fiber, an essential nutrient necessary for digestive health. Fiber aids in regulating bowel movements, preventing constipation, and promoting a healthy gut microbiome, making soursop a great addition to a balanced diet. The tropical fruit is packed with fiber, an essential nutrient necessary for digestive health.

Ingredients You’ll Need
- Soursop: The star ingredient is rich in antioxidants and fiber.
- Mangos: Use fresh mangos for their sweet, juicy taste. Adding frozen mango helps achieve a thicker, colder smoothie consistency, making it extra refreshing on those hot days. Mangos are packed with vitamins A and C, which are beneficial for eye health, skin, and immune function. Alternatively, you can use ice to reach the desired consistency.
- Coconut Milk: This gives the drink a creamier quality that gives it a milkshake consistency. Coconut milk is a good source of healthy fats, which can provide energy and support brain health. It also contains medium-chain triglycerides (MCTs), known for their potential benefits in boosting metabolism and improving heart health.
How to Remove Soursop Seeds
The process to remove seeds from the soursop is so simple. Begin by rinsing the fruit to remove any dirt or residue.
Then slice the fruit in half. Use a spoon to scoop out the flesh. You can remove the seeds by hand.


How to Make a Soursop Smoothie
Combine all ingredients in the blender and blend until smooth. Add more frozen mango or ice to reach your desired consistency.


Tips To Nail the Recipe
- Use ripe fruits. Ripe soursop and mango yield the best texture and flavor. Unripe soursop is bitter and not nearly as soft.
- Remember to remove the seeds. They are not edible and should not be consumed.
- For the best results, use a high-speed blender. It's the best way to thoroughly combine the ingredients, resulting in a smooth, lump-free texture. This also ensures that the frozen ingredients are effortlessly blended for a thick, smooth consistency.
Variations
- SWEETNESS. If you prefer a sweeter smoothie, you can add a bit of honey or agave syrup.
- FRUIT COMBOS. Soursop pairs well with any tropical fruit. Instead of mango, you can use papaya, pineapple, strawberry, banana, or any fruit you desire. Or make it with soursop only and add fresh lime and ice.
- ADD VEGGIES. Add a handful of spinach or kale for an extra nutrient boost.
- CONSISTENCY. Add more frozen mango or ice if you like a thicker smoothie.
Storage
Store any leftover soursop smoothie in an airtight container in the refrigerator for up to 24 hours. Shake well before drinking.

FAQs
What does soursop do to your body?
Due to its high antioxidant count, soursop is great for boosting the body's immunity. And because it's rich in fiber, it promotes healthy bowel movements and general digestive health too.
Is it safe to drink soursop juice everyday?
Soursop should not be consumed as a supplement or a daily beverage. Most health professionals suggest limiting your consumption to half a cup 2-3 times per week. This is especially important for people with high blood pressure or diabetes.
What is the best way to drink soursop?
The best way to drink soursop is by making a soursop smoothie. This method allows you to blend the fruit with other nutritious ingredients like mango and coconut milk. You retain all the beneficial vitamins, minerals, and antioxidants of the fresh soursop while enhancing the flavor and texture.
What if I can't find fresh soursop?
If fresh soursop is unavailable, you can use frozen soursop pulp, which is often available in international or specialty grocery stores.

I Hope You Enjoy This Soursop Smoothie Recipe!
If you try the recipe, don’t forget to rate the recipe and let me know what you think in the comments. Leave a quick review & star rating ★ below! Take pictures, tag #goodfoodbaddie, and share them with me on Instagram, Facebook, and Pinterest! I love seeing my recipes come to life in your kitchen.
More Nutritious Recipes To Try!
- 10 Ways To Use Sea Moss Gel
- Quick & Easy Date Snickers
- Adrenal Cocktail Recipe
- Cacao Tea Recipe And Benefits
Fresh Soursop Smoothie (Guanabana Smoothie)

This Soursop Smoothie is a delicious and nutritious tropical beverage made with soursop (guanabana), mangos, and coconut milk. As vibrant and lush as it is refreshing, this soursop smoothie recipe is the drink of the summer!
- 1 Ripe Soursop (about 1lb or 500 grams)
- 1-2 Mangos (depending on the size)
- 1 cup frozen mango (optional (or ice))
- 1 cup coconut milk
- Combine all ingredients in the blender and blend until smooth. Add more frozen mango or ice to reach your desired consistency.

Quick & Easy Date Snickers
Date Snickers are peanut butter stuffed Medjool dates dipped in luscious melted dark chocolate. This healthy Snickers recipe is inspired by the TikTok trend and it's bound to become your go-to treat! (This recipe is gluten-free and vegan.)
For more nutritious snacks, try our Date Energy Balls and Frozen Yogurt Bark next!

Satisfy your sweet tooth with Medjool date Snickers. They taste just as indulgent as a Snickers bar but they are actually good for you!
This date Snickers hack went viral and for good reason! You get the rich chocolatey flavor and chewy texture you love without the calories.
Reasons This Date Snickers Recipe Works
- Healthy Alternative to Candy Bars! There are no additives or refined sugar; just natural ingredients that you can actually pronounce. Peanuts are rich in protein. Also, dates are packed with fiber and are naturally low in fat.
- Made Quick & Easy! This 5 ingredient recipe is ready to enjoy in less than 20 minutes. The prep time is just 10 minutes and then you let them chill in the fridge for another 10. It is that simple!
- Anytime Snack! Have you ever craved chocolate for breakfast or just before bed? You can enjoy this decadent treat anytime, anywhere so have it as a mid-day boost or a late-night snack.

Date Snickers Ingredients
- Medjool dates: The natural sweetness of these dates make them a tasty and nutritious substitute for caramel. They also add a pleasant chewiness to the snack.
- Peanut butter: Use your favorite creamy peanut butter for these date Snickers.
- Peanuts: Add chopped or crushed nuts for a delightful crunch.
- Chocolate: Use dairy-free dark chocolate chunks or chocolate chips.
- Coconut oil: Adding this to the chocolate prevents it from drying out and also helps it solidify faster in the fridge.

How to Make Date Snickers
PREPARE MEDJOOL DATES. Using a small sharp knife, make a lengthwise slit in each date and remove the pits.
STUFF DATES. Fill each date with 1 teaspoon of peanut butter and a few peanuts. Set the filled dates aside.
MELT CHOCOLATE. Take a microwave-safe bowl and place the chocolate and coconut oil in it. Microwave the bowl at 30-second intervals, stirring the chocolate in between each interval until it melts completely.
DIP DATES. Insert a toothpick into each stuffed date, and dip the date into the melted chocolate. Use a spoon to coat the date entirely in chocolate, allowing any excess chocolate to drip off.
ADORN AND CHILL SNICKER DATES. Transfer the chocolate-coated date to a tray or plate lined with parchment paper. Sprinkle the top of each date with crushed peanuts or with flaky sea salt. Place the dates in the refrigerator for approximately 10 minutes to allow the chocolate to set.
Enjoy your homemade date Snickers after the chocolate has set! Keep them in the fridge and enjoy them anytime you like!

Tips To Nail the Recipe
- I don't recommend substituting medjool dates with another type of date. The taste and texture won't be the same. Also, medjool dates are the perfect size for stuffing.
- Use fresh dates so they are plump, soft, and sticky.
- Don't skip the coconut oil. Without it, the chocolate is super thick.

Variations
- NUTS. Swap the peanuts for walnuts or pecans.
- NUT BUTTER. Instead of peanut butter, make date Snickers with almond butter.
- CHOCOLATE. I use dark chocolate because it is dairy-free and naturally sweet without processed sugar but you can also make date Snickers with milk chocolate or white chocolate.
- TOPPINGS. Add flaky sea salt or coconut flakes to chocolate-covered dates for more flavor and texture.

Storage
Store your date Snickers in an airtight container in the fridge for up to one week. For longer storage, place them in the freezer for up to 2 months.

FAQs
Why do dates taste like Snickers?
Medjool dates are naturally sweet and have a caramelized flavor so they are the perfect substitute for caramel.
How long do Snickers dates last in the fridge?
These date snickers last for one week when properly stored in the fridge.
Are dates a healthy sweetener?
Yes. Dates work great as a sugar substitute. They are naturally sweet and you get the added benefit of fiber.

I Hope You Enjoy This Viral Date Snickers Recipe!
If you try the recipe, don’t forget to rate the recipe and let me know what you think in the comments. Leave a quick review & star rating ★ below! Take pictures and share them with me on Instagram, Facebook, and Pinterest! I love seeing my recipes come to life in your kitchen.
More Healthy Recipes To Try!
- Cherimoya Smoothie (Easy and Delicious!)
- Apple Cucumber Juice (In Blender)
- Hydrating Cherry Smoothie
Quick & Easy Date Snickers

Date Snickers are peanut butter stuffed medjool dates dipped in luscious melted dark chocolate. This healthy Snickers recipe is inspired by the TikTok trend and it's bound to become your go-to treat! (This recipe is gluten-free and vegan.)
- 12 Medjool dates (pits removed)
- ¼ cup Peanut butter
- 2 tbsp Chopped or crushed peanuts
- ½ cup Dark chocolate chunks or chocolate chips ((vegan or regular))
- 1 tbsp Coconut oil
- 1 tbsp Flaky Sea Salt (optional)
- Using a small sharp knife, make a lengthwise slit in each date and remove the pits.
- Fill each date with 1 teaspoon of peanut butter and a few peanuts. Set the filled dates aside.
- Take a microwave-safe bowl and place the chocolate and coconut oil in it. Microwave the bowl at 30-second intervals, stirring the chocolate in between each interval until it melts completely.
- Insert a toothpick into each stuffed date, and dip the date into the melted chocolate. Use a spoon to coat the date entirely in chocolate, allowing any excess chocolate to drip off.
- Transfer the chocolate-coated date to a tray or plate lined with parchment paper. Sprinkle the top of each date with crushed peanuts or flaky sea salt.
- Place the dates in the refrigerator for approximately 10 minutes to allow the chocolate to set.
- Enjoy your homemade date Snickers after the chocolate has set! Store them in the fridge and enjoy anytime you're craving a sweet treat!
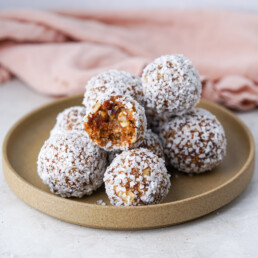
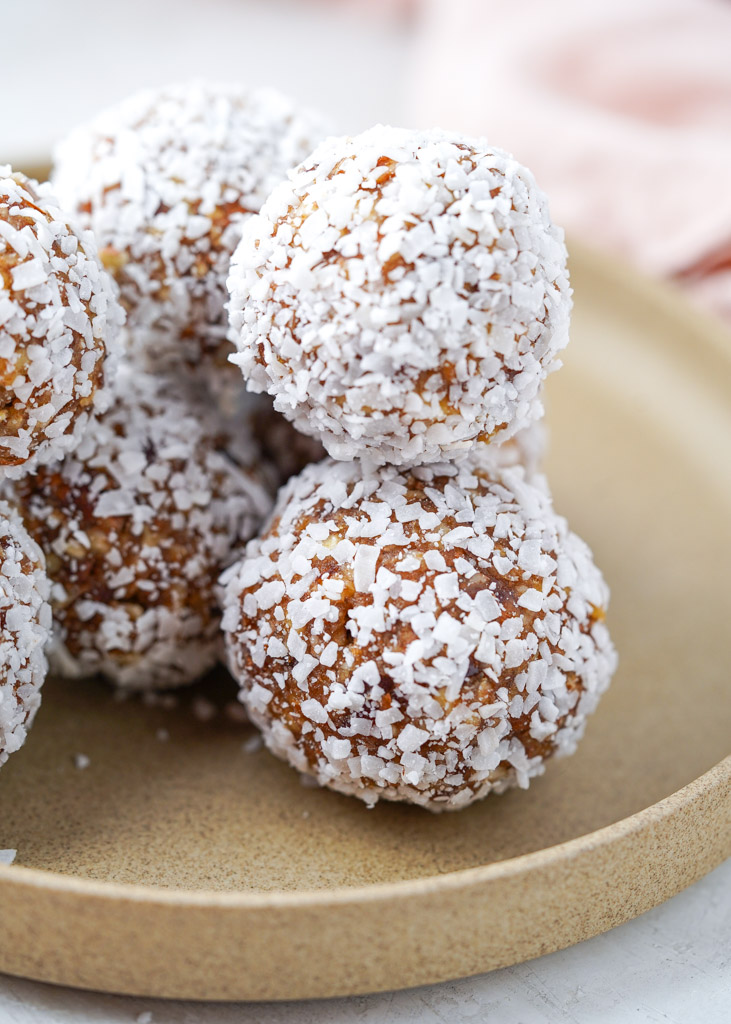
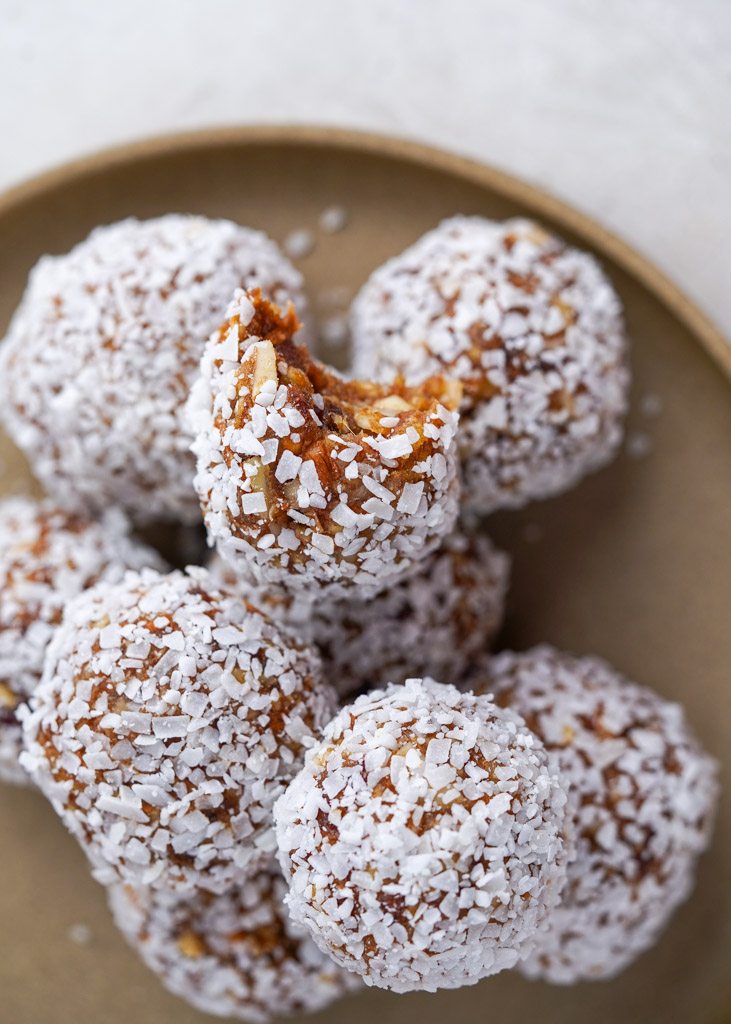
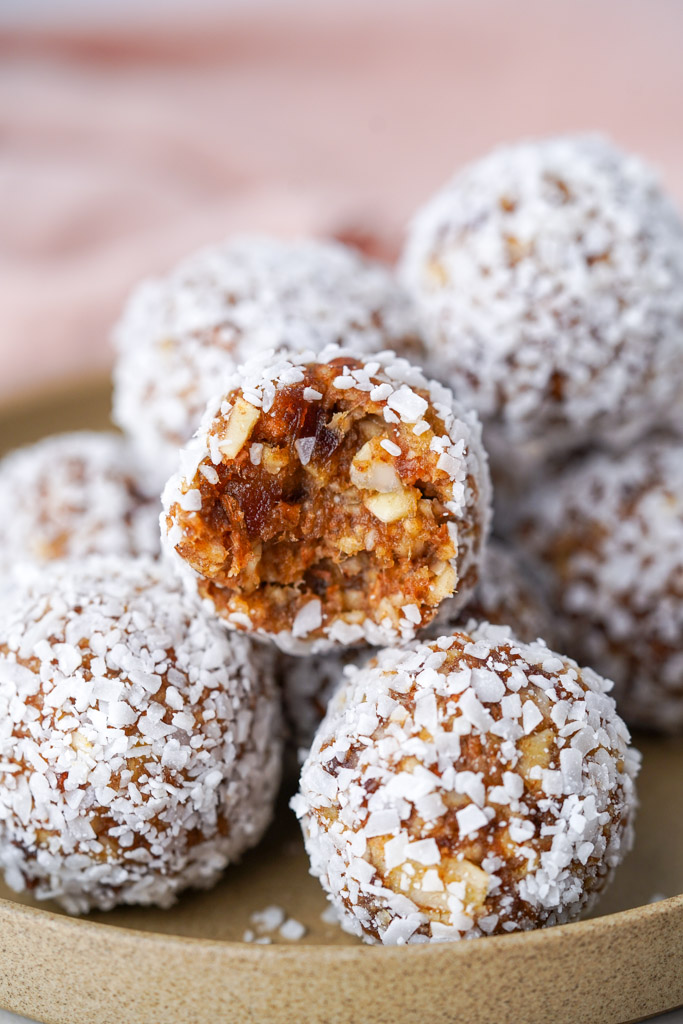
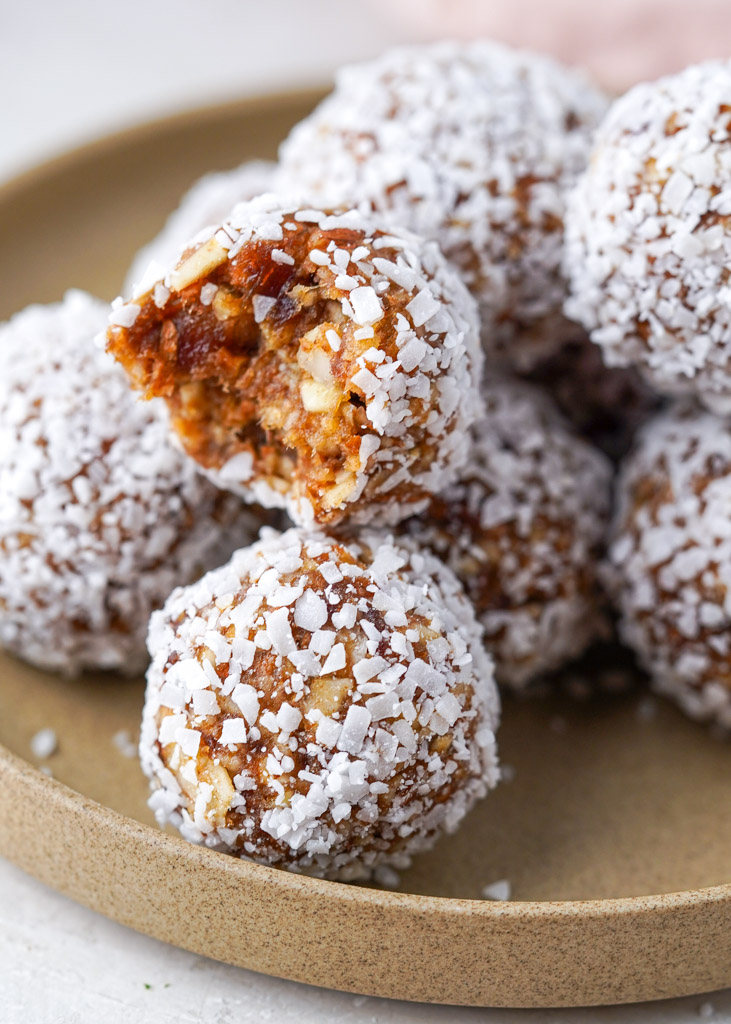
Best Date Energy Balls Recipe (4 ingredients)
These 4-ingredient date balls are packed with a deliciously sweet, nutty flavor and coated in tasty coconut. No-bake date energy balls are a quick, easy, healthy snack with just 20 minutes of prep time and perfect for a healthy, energizing snack. (This recipe is gluten-free, vegan, whole30, paleo, and refined sugar-free.)
For more healthy, delicious snacks, try our Frozen Yogurt Bark recipe next!
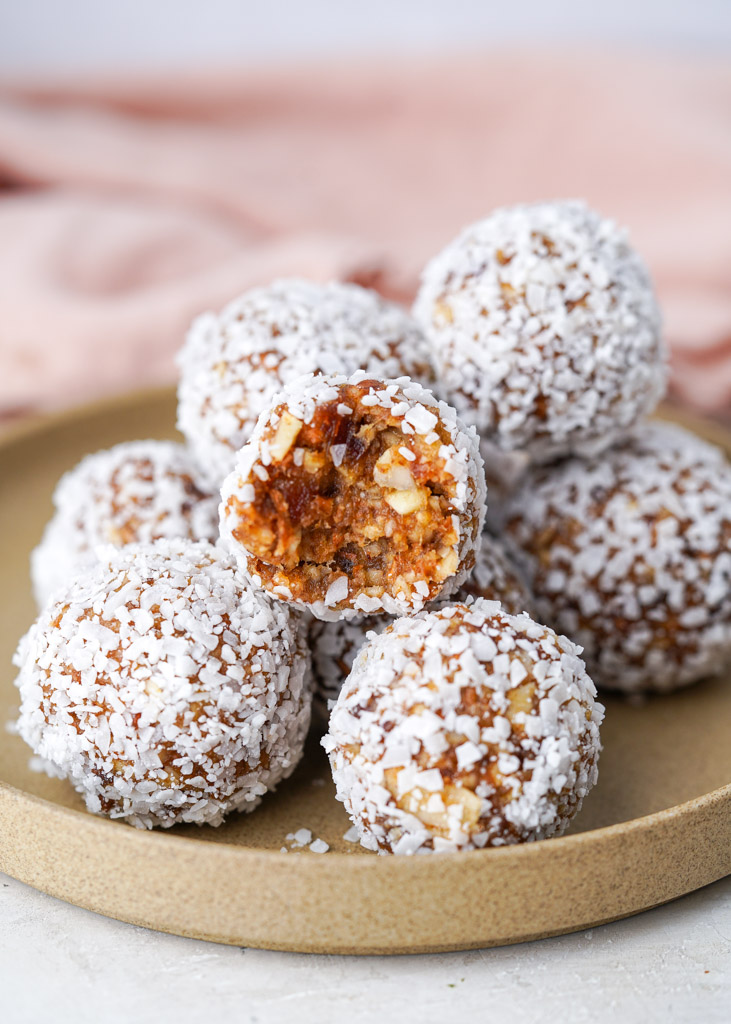
Date balls are a chewy, nutty treat that will satisfy your sweet tooth, made with absolutely no sugar! How is this possible? Dates are dried fruit and a natural sweetener with a caramel-like taste and consistency. When blended with raw pecans and sliced almonds, and then rolled in finely ground coconut, this healthy date ball recipe is absolutely delicious and so satisfying! It will quickly become your favorite go-to snack!
Reasons This Date Energy Balls Recipe Works
- Quick & Easy! Learn how to make energy balls with dates with just a few simple instructions and a handful of wholesome ingredients.
- Healthy Snack! Coconut date balls are packed with fiber and antioxidants so you can indulge guilt-free.
- Better than Energy Bars! Save money with this healthier option that can be modified to suit your taste buds.
5 Health Benefits of Dates
Improves Digestion
Dates are a good source of fiber, which promotes regular bowel movements and prevents constipation. When the digestive system is working properly, the body better absorbs nutrients, improving both the liver and kidneys. This in turn detoxifies the body.
Boosts Brain Health
Regularly consuming dates improves brain function and reduces the risk of Alzheimer's. The antioxidants in dates have also been proven to reduce inflammation throughout the body, including the brain.
Reduces Labor Time
The fatty acids in dates promote the production of prostaglandins, lipids that encourage pregnancy contractions. This lowers the need for induced labor and may also reduce labor time, for easier natural labor.
Natural Energy Booster
With high levels of potassium and fruit sugar, dates are an excellent way to refuel your body, first thing in the morning. Consume them before a workout for more energy. Dates stimulate the metabolism, also promoting weight loss.
A Great Diabetic Snack
The fiber found in dates allows the body to absorb carbs at a slower rate, which people with diabetes need. Dates reduce blood sugar, which makes it a healthier snack for those living with diabetes.
Ingredients You’ll Need
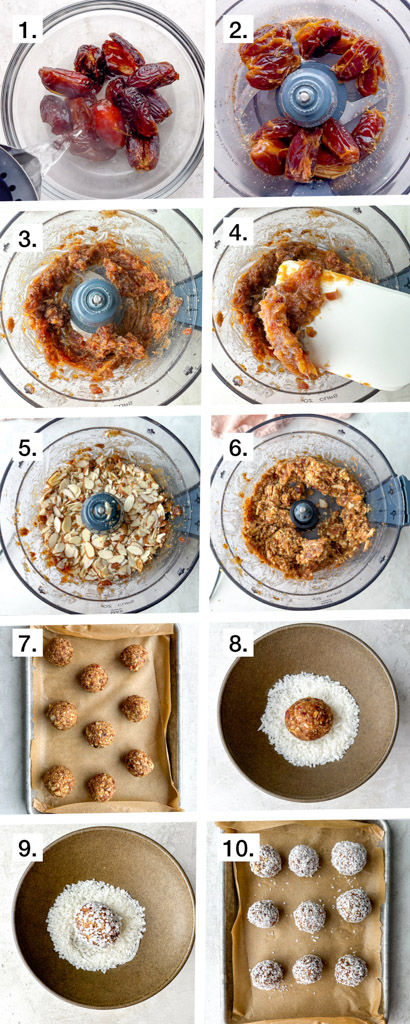
- Medjool Dates: Remove the pits, soak them for 10 minutes so they can soften, and then drain them.
- Raw Pecans: This healthy fat is also a plant-based protein, known to boost energy.
- Sliced Almonds: Almonds are low in carbs and packed with both protein and fiber.
- Desiccated Coconut: Desiccated coconut is finely ground coconut, rather than a bigger strip, and is usually drier than shredded coconut. Feel free to use shredded coconut it that is what you have available. It is a good idea to pulse it in the food processor first to break into smaller pieces.
How to Make Date Balls
- SOAK DATES. Remove the pits from the Medjool dates and put them in warm water for 10 minutes to make them soft and easier to blend.
- BLEND PECANS. Place the pecans in the food processor and pulse until broken into smaller pieces. Transfer to a bowl and set aside.
- BLEND DATES. Put the pitted dates in a food processor or blender. Blend on high until it becomes a thick mixture that feels sticky.
- COMBINE PECANS, DATES & ALMONDS. Add the pecans and almonds. Blend until the nuts are incorporated into the date paste.
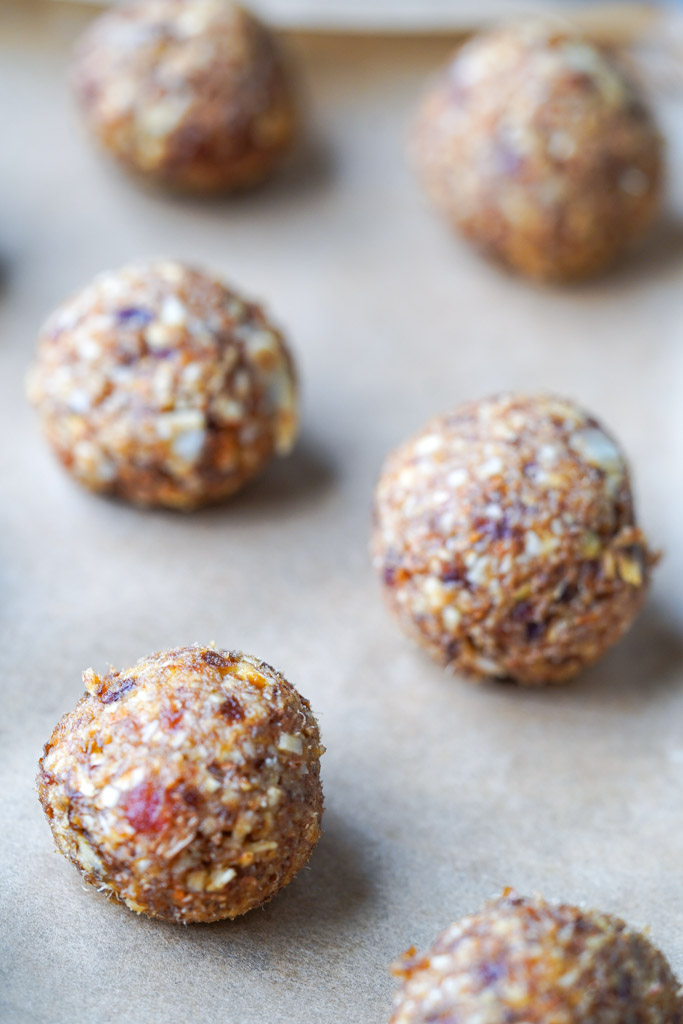
- FORM DATE BALLS. Take about 1-2 tablespoons of the mixture and use your hands to shape it into a ball. Transfer the balls onto a parchment paper-lined baking sheet and place in the fridge for 10 minutes.
- ROLL BALLS IN COCONUT. Roll the energy bites in coconut flakes by pressing them gently. You should have around 9-12 date energy bites (depending on the size). Finally, enjoy!
Tips To Nail the Recipe
- Soak the dates so that they are easier to blend and create a sticky paste.
- You can grind shredded coconut yourself to make the pieces smaller.
- If you do not have a food processor, use a high-power blender instead. However, you may need to blend in batches.
- If the date balls are too dry, incorporate more dates or another sticky ingredient that can act as an adhesive (i.e., honey, nut butters). And if it is too wet, use more dry ingredients.
- Do not skip the chilling process because this makes it easier to roll the balls in the coconut.
Variations
- Want chocolate date balls? Roll the balls in melted chocolate and set them in the fridge. Alternatively, add chocolate chips to the mix.
- Want the date balls to be sweeter? You don't have to add sugar, maple syrup, or agave. Instead, blend the Medjool dates with dried apricot for an even sweeter treat.
- Try walnuts or cashews for a boost of omega-3 fatty acids. Add any of your favorite nuts to taste. You can even use nut butter if you prefer. Almond butter or peanut butter are great options.
- To make it heartier, add rolled oats when blending.
- Whether you have a nut allergy or just don't like nuts, replace them with seeds for date balls without nuts. I suggest sunflower seeds, hemp seeds, chia seeds, or pumpkin seeds.
- If you aren't using salted nuts, add a pinch of salt for a salty-sweet flavor combination.
- Add spices like cinnamon, cardamom, and ginger for a warm flavor. Use vanilla extract or almond extract for even more flavor.
Storage
Store date balls in an airtight container in the fridge for up to 2 weeks. For longer storage, freeze them for up to 3 months. Allow them to thaw overnight in the refrigerator before enjoying.

FAQs
Are date energy balls healthy?
Date balls are a nutritious snack with many health benefits. When consumed in moderation, they can be part of a healthy balanced diet. Be mindful of how you customize them and what ingredients you include because dates are already high in calories.
What are date balls made of?
This recipe includes dates and nuts. Some date ball recipes include nut butter, seeds, protein powder, dried fruits, or chocolate.
What is the ratio for date energy balls?
For every 10 dates, use 2 cups of your preferred nuts.
I Hope You Enjoy This Date Energy Balls Recipe!
If you try the recipe, don’t forget to rate the recipe, and let me know what you think in the comments. Leave a quick review & star rating ★ below!
Best Date Energy Balls Recipe

These 4-ingredient date balls are packed with a deliciously nutty flavor and restore your energy. No-bake date energy balls are a quick, easy, healthy snack with just 20 minutes of prep time. (This recipe is gluten-free, vegan, whole30, paleo, and refined sugar-free.)
- 10-12 Medjool Dates (pits removed, soaked, and drained)
- 1 cup Raw Pecans
- 1 cup Sliced Almonds
- ½ cup Desiccated Coconut
- Remove the pits from the medjool dates and put them in warm water for 10 minutes to make them soft and easier to blend.
- Put the pitted dates in a food processor or blender. Blend on high until it becomes a thick mixture that feels sticky.
- Add the pecans and almonds. Blend until the nuts breakdown and are incorporated into the date paste.
- Take about 1-2 tablespoons of the mixture and use your hands to shape it into a ball. Transfer the balls onto a parchment paper-lined baking sheet and place in the fridge for 10 minutes.
- Roll the energy bites in coconut flakes by pressing them gently. You should have around 9-12 date energy bites. Enjoy!

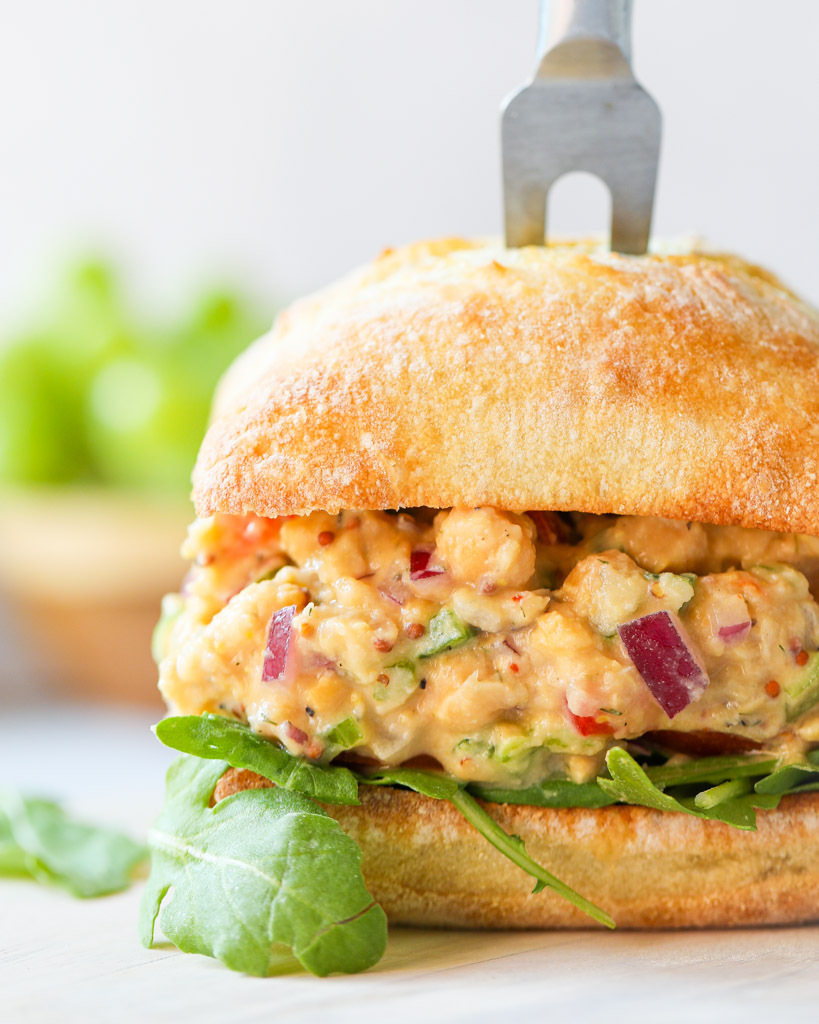
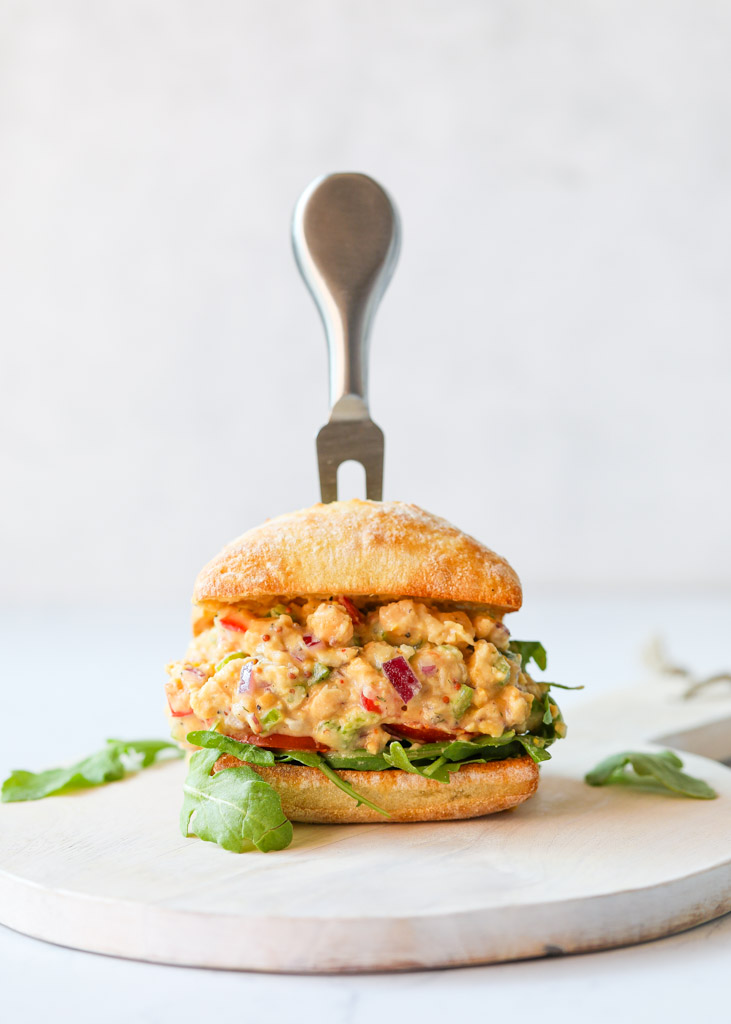
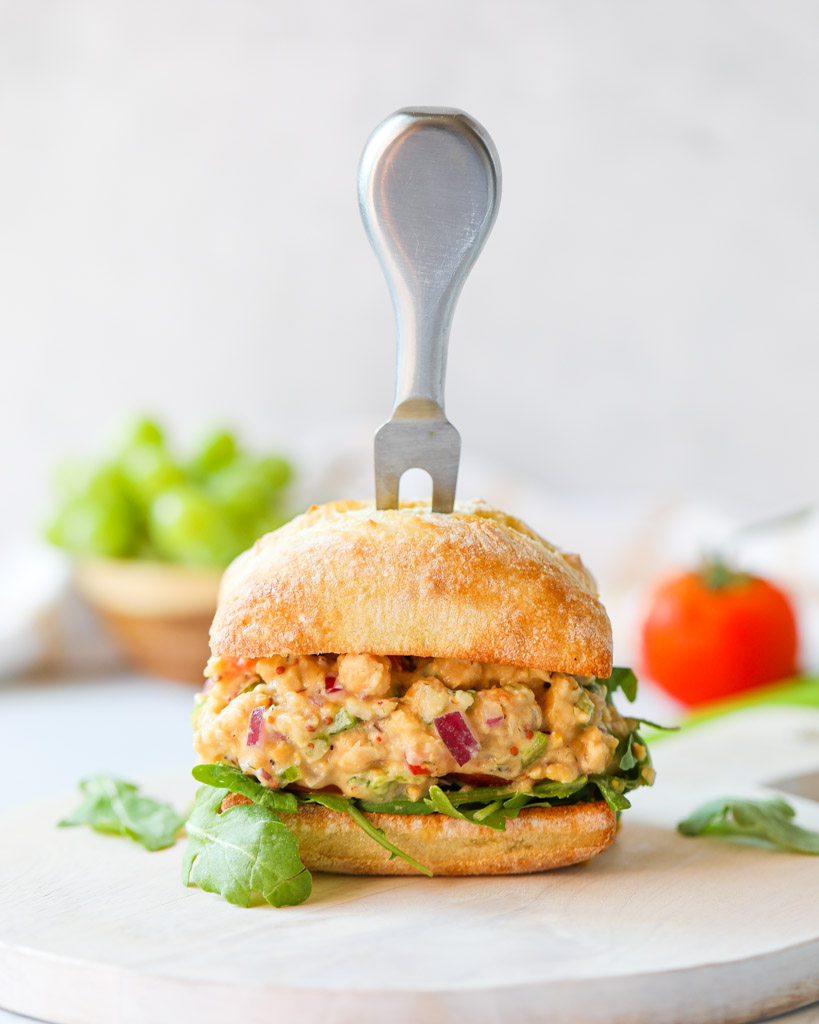
Vegan Chickpea Salad Sandwich
This chickpea salad sandwich is a creamy mix of smashed chickpeas, herbs, and spices. Serve this savory mixture between two slices of bread or in a wrap as a vegan alternative to tuna salad or chicken salad. (This recipe is gluten-free, dairy-free, and vegan.)

This chickpea salad sandwich is the sandwich of my dreams! It’s jam-packed with flavor, super filling, and absolutely mouthwatering. I like to enjoy it for lunch with sliced veggies, homemade sweet potato fries, or potato chips. Paired with Refreshing Cucumber Apple Juice, this is the ultimate meal for lunch!
Reasons This Chickpea Salad Sandwich Recipe Works
- A Healthy Meal! Enjoy a meatless meal that still provides plenty of fiber and protein.
- So Delicious! This vegan chickpea salad sandwich is definitely not bland. It's bursting with flavor and texture from mashed chickpeas, zesty Dijon mustard, and crisp celery.
- Good for Meal Prep! This is easy to prepare and stores well so you can enjoy it for lunch throughout the week.

Chickpea Health Benefits
Chickpeas, also known as garbanzo beans, are a legume packed with nutrients.
Super Filling
Curb your appetite with a food rich in protein and fiber. Both slow digestion, helping you to feel full for longer. This in turn lowers calorie intake, which helps with weight loss and management.
Improves Bone Health
Chickpeas contain calcium and iron, two minerals that strengthen bones and teeth.
Aids Digestion
Chickpeas have soluble fiber which helps to prevent the growth of bad bacteria in the gut and constipation. It also promotes regular bowel movements. Additionally, eating chickpeas regularly can reduce the likelihood of IBS (Irritable Bowel Syndrome) and colon cancer.
Great for Heart Health
Fiber, potassium, and Vitamin B are all found in chickpeas and can lower cholesterol levels. This reduces the risk of heart disease, heart failure, and cardiovascular disease.
Ingredients You’ll Need
- Chickpeas: Rinse and drain the chickpeas before smashing them.
- Celery Stalks: Dice for crunchy bits throughout the sandwich.
- Peppers: I add diced red bell pepper and jalapeño for a kick of spice.
- Basic Cashew Cream: This is the key to a creamy chickpea salad sandwich with no mayo.
- Dijon Mustard: This has a tangy sharp flavor.
- Red Onion: Diced.
- Fresh Lemon Juice: For a touch of bright acidity, add this citrus fruit.
- Dried Dill: Add for a fresh, herby taste.
- Seasoning: I season with garlic powder, salt, and black pepper to taste.
How to Make Chickpea Salad Sandwich
MASH CHICKPEAS. Add rinsed and drained cooked chickpeas to a large bowl. Use a fork or potato masher to mash the chickpeas until you reach your desired consistency.
COMBINE OTHER INGREDIENTS. Add the remaining ingredients to the chickpea mixture and stir until well combined.
SERVE ON BREAD OR IN A WRAP. Enjoy your chickpea salad on sandwich bread or in a wrap with leafy greens and tomato. A good low carb, high protein option is a Cottage Cheese Wrap.
Tips for the Best Chickpea Salad Sandwich
- Remember to rinse the chickpeas before mashing them in order to remove excess sodium.
- You can mash all of the chickpeas or leave about ¼ whole to give the chickpea salad added texture.
- If you don't plan to eat this immediately, store it in the fridge in an airtight container. Add it to bread, a wrap, or serve on a bed of lettuce when you're ready to eat, so the salad doesn't make the other ingredients soggy.
Variations
- Mayonnaise: The cashew cream is a replacement for mayo but you can use vegan mayo instead.
- Tahini: This creamy sesame seed paste is also an excellent option to make creamy chickpea salad without mayo
- Toppings: Add sliced tomatoes, avocados, or pickles.
- Curry: For a curried chickpea salad sandwich, add curry powder to the chickpea mixture. Add raisins for a delicious balance of spicy and sweet flavors.
- Buffalo Chickpea Salad Sandwich: Add your favorite hot sauce directly to the cashew cream or vegan mayo.
- Add Some Crunch: Add crispy chickpeas into your chickpea salad for an added crunchy texture.
Storage
Store any leftover chickpea salad in an airtight container in the fridge for up to three days.
FAQs
Can you eat chickpeas straight from the can to a salad?
Yes. Canned chickpeas are precooked so can be eaten straight from the can.
Why is chickpea salad good for you?
Chickpea is a nutritious addition to a well-balanced diet. It's rich in fiber and protein so it promotes digestion and helps you feel full for longer.
What goes well with chickpeas?
Chickpeas are extremely versatile and can be made with a variety of spices, herbs, and vegetables. They go well with just about anything!
I Hope You Enjoy This Healthy Chickpea Salad Sandwich Recipe!
If you try the recipe, don’t forget to rate the recipe and let me know what you think in the comments. Leave a quick review & star rating ★ below! For more recipes using chickpeas, check out this High-Fiber Salad!
Vegan Chickpea Salad Sandwich

This chickpea salad sandwich is a creamy mix of smashed chickpeas, herbs, and spices. Serve this savory mixture between two slices of bread or in a wrap as a vegan alternative to tuna salad or chicken salad. (This recipe is gluten-free, dairy-free, and vegan.)
- 1 15 oz Can Chickpeas (rinsed and drained)
- 2 Celery Stalks (diced)
- ½ Red Pepper (diced)
- 1 Jalapeño (diced (optional))
- 3 tbsp Basic Cashew Cream ((can sub with tahini or vegan mayo))
- 3 tsp Dijon Mustard
- ¼ Red Onion (diced)
- 1 tbsp Lemon Juice
- ½ tsp Dried Dill
- ½ tsp Garlic Powder
- Salt and Pepper (to taste)
- In a large bowl, add the rinsed and drained cooked chickpeas. Use a fork or potato masher to mash the chickpeas until you reach your desired consistency. You can mash all of the chickpeas or leave about ¼ whole to give the chickpea salad added texture.
- Add the remaining ingredients and mix until well combined.
- Enjoy your chickpea salad on sandwich bread or in a wrap with leafy greens and tomato. Store any leftover chickpea salad in an airtight container in the fridge for up to three days.