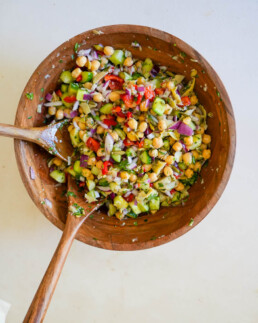
Easy High Fiber Salad Ready in Minutes!
This High-Fiber Salad is perfect when you are looking for a quick, filling meal packed with good-for-you nutrients. Not only is it high in fiber, but its also loaded with plant-based protein, antioxidants, and healthy fats that help improve digestion, gut health, and heart health.

Fiber is the key to gut health and is your gut's best friend! It moves through your digestive system, picking up all the junk and making sure everything runs smoothly. This means fewer stomach troubles and a happier you!
Here are some of the key benefits of this High-Fiber Salad:
- Perfect For Lunch! You can enjoy it midday without the post-meal crash. Fiber slows down the absorption of sugar, giving you steady energy throughout the day. No more sugar crashes or mid-afternoon slumps.
- Keeps You Full, Which Means Less Snacking. Fiber adds bulk to your meals, helping you feel satisfied and less likely to reach for those extra snacks. Plus, it’s super helpful if you want to maintain a healthy weight.
- Improves Gut Health. Your gut is home to trillions of good bacteria that love fiber. When you feed them fiber, they produce substances that keep your gut lining healthy and happy. A happy gut means a happier you!
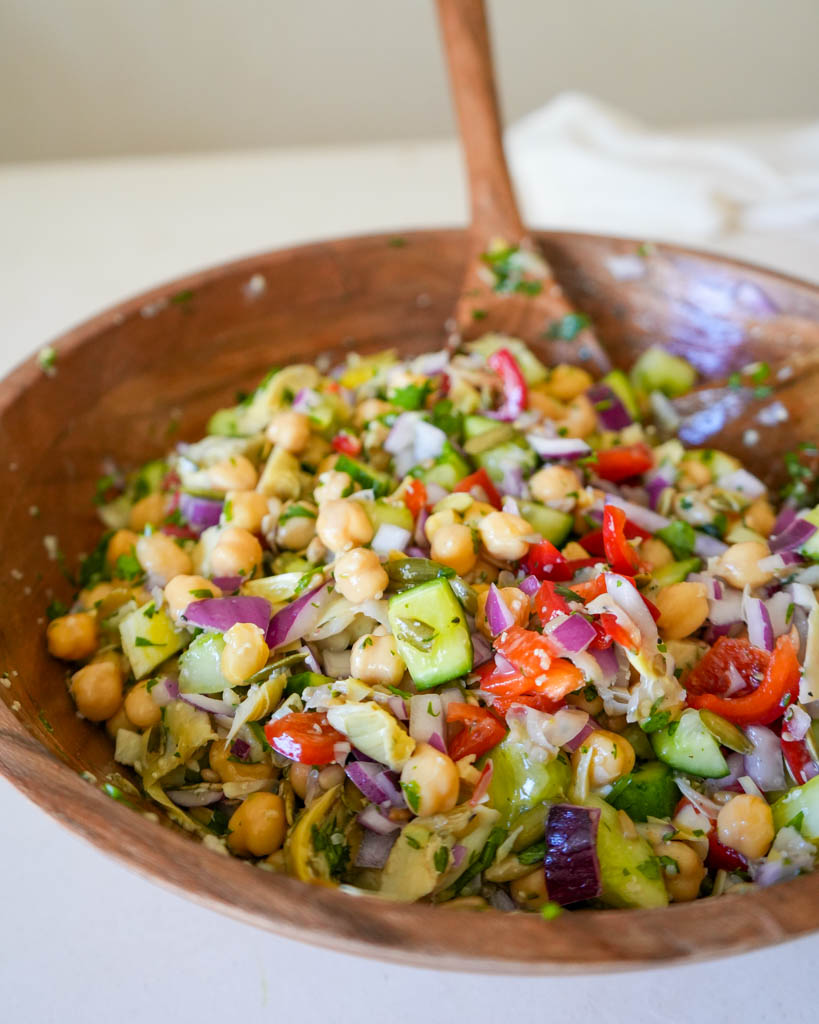
I love this salad because it is not your typical leafy-green boring salad AND it is easy to throw together with some pantry staples and a few fresh herbs and vegetables. It's also perfect for meal prep because the longer the salad sits in the homemade citrus vinaigrette, the better it tastes.
Ingredients You'll Need
- Cucumber: Use 1 large cucumber or 2-3 Persian cucumbers. Have high water content, which helps to keep you hydrated
- Red Onion: Raw red onion is especially high in fiber and also contains antifungal agents that help fight off harmful bacteria in the body
- Red Pepper: Red peppers are packed with antioxidants, particularly vitamin C and beta-carotene, that help reduce inflammation in the gut, protecting the digestive tract from oxidative stress and potential damage.
- Chickpeas: A great source of plant-based protein and are high in fiber and healthy fats. It is a great meat replacement and bulks up the salad.
- Fresh Herbs: Parsley and Cilantro are both incredibly high in vitamin A, folate, vitamin K, iron, and vitamin C. Not only do they add a vibrant flavor to the salad but the vitamin content helps detox the body and improve brain function.
- Super Seeds: Hemp Seeds, Pumpkin Seeds, and Sunflower Seeds are a great source of protein and omega-3 and omega-6. These heart-healthy seeds add crunch to the salad.
The dressing for the salad is a simple lemon-lime vinaigrette that enhances the flavor and the freshness of the ingredients. It is easy to whip up in minutes!

Storage and Meal Prep Option
This salad lasts in the fridge for up to 3 days in an airtight container. It is great for meal prep. You can divide it into equal portions and store it in mason jars for an easy grab-and-go lunch.
Quick and Easy High-Fiber Salad

This High-Fiber Salad is perfect when you are looking for a quick, filling meal packed with good-for-you nutrients. Not only is it high in fiber, but this salad is loaded with plant-based protein, antioxidants, and healthy fats that help improve digestion, gut health, and heart health.
- 1 large cucumber (or 2-3 Persian cucumbers)
- 1 red onion
- 1 red pepper
- 2 16oz can chickpeas, rinsed and drained
- 8 oz marinated artichoke, drained and cut into pieces
- 1/4 cup chopped cilantro, packed
- 1/4 cup chopped parsley, packed
- 4 tbsp Hemp Seeds
- 4 tbsp Pumpkin Seeds
- 4 tbsp Sunflower Seeds
Citrus Vinaigrette
- 1/4 cup extra virgin olive oil
- 3 tbsp fresh lemon juice
- 3 tbsp fresh lime juice
- 1 tsp dijon mustard (optional)
- 2 tbsp apple cider vinegar or red wine vinegar
- 1 tbsp honey or maple syrup (optional for a touch of sweetness)
- 1 garlic clove, minced (optional)
- salt and pepper, to taste
- Add all the ingredients for the salad into a large bowl and toss to combine
- In a small bowl, whisk together the ingredients for the dressing. Taste and adjust as desied, adding more lemon/lime for tangier dressing or honey to sweeten.
- Pour the dressing onto the salad and toss well. Enjoy!
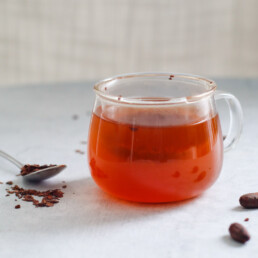
Cacao Tea Recipe And Benefits
Cacao Tea is a naturally sweet, chocolate tea made from brewed cacao husk that is both energizing and nutritious. Instead of throwing away the shells of cacao beans, enjoy their immense benefits and use them to make a delicious drink! This quick and easy 2-ingredient hot tea that's ready in just 5 minutes. (This recipe is gluten-free, vegan, and refined sugar-free.)
For more healthy drink recipes, try our Hydrating Cherry Smoothie and this Easy Detoxifying Spirulina Drink next.

I love tea and this cacao tea is exceptional. I tried it for the first time when I lived in Peru and now I'm obsessed. I went to a chocolate-making class where I learned of Peru's rich culture of chocolate-making. We learned the entire process of making chocolate from removing the cacao beans from the fruit, to roasting the beans, removing the shell, grinding them, and more! The instructor excitedly explained all the incredible benefits of cacao tea including its ability to energize the body similar to a cup of coffee but without the jittery effect or harsh coffee crash. They mentioned it is also great for lactating mothers as it energizes, increases oxytocin, and helps increase milk production.
So you can immediately see, cacao tea has such great benefits. I enjoy a cup first thing in the morning with breakfast to get my day started and sometimes after a meal. Why not skip the caffeine jitters and enjoy a hot cup of cocoa tea?
Reasons This Cacao Tea Recipe Works
- Super Simple! All you need is cacao husk and hot water to make this hot tea.
- Great Coffee Alternative! Get a boost of energy without the negative side effects associated with caffeine.
- A Healthy Beverage! Try it for the taste but keep drinking for all the health benefits! Cacao husks and nibs are rich in powerful antioxidants, minerals, and vitamins like magnesium and Vitamin C so it supports overall wellness.

What is Cacao Tea?
Cacao tea (not to be confused with cocoa tea) is loose-leaf cocoa husks infused in hot water. This hot beverage was discovered by the Mayan civilization.
What is the difference between cacao beans and cocoa beans?
Pronounced “Ca-cow”, Cacao is the raw, unprocessed version of cocoa. Cacao beans are cocoa beans in their natural state. The raw bean is referred to as cocoa beans once they are roasted.

Cacao Tea Benefits
Increases Energy
Cacao is high in theobromine, a caffeine-like stimulant, found in cacao and chocolate. It acts as a stimulant in the body while creating a more relaxed effect by increasing serotonin and dopamine levels and reducing stress by reducing cortisol levels.
Great for Brain Health
The antioxidants and anti-inflammatory properties present in cacao husk reduce the cell damage that could potentially lead to Alzheimer's disease. Regularly drinking cacao husk tea also increases focus.
Mood-Boosting Properties
Cacao husks are rich in theobromine, a natural substance that stimulates the brain and reduces mental fatigue. It also acts as a natural muscle relaxer and decreases blood pressure.
Maintains Heart Health
Flavonoids in cacao have been proven to reduce the risk of heart disease. The HDL (high-density lipoprotein) cholesterol found in dark chocolate (derived from cacao) reduces the risk of heart disease and stroke.
Improves Digestive Health
The cacao bean contains fiber which encourages regular bowel movements, relieves stomach issues, and prevents hemorrhoids. And the antioxidants in cacao husks reduce the risk of colon cancer.
Great For Women Breastfeeding
Cacao contains a substance called theobromine, which has been shown to increase milk production in lactating women.

Ingredients You’ll Need
- Cacao Husk: The shell of the cacao bean is often overlooked and discarded but this is a superfood with so many nutritious benefits. It has a delicate chocolate flavor that makes it a great healthy treat.
- Water: This is the liquid base of the tea.
OPTIONAL ADD-INS
- Cinnamon: This adds a warm, aromatic quality that counters the tart, sometimes bitter taste of raw cacao.
- Agave syrup: Use this natural sweetener if you want a sweeter cacao tea.
- Milk of choice: You can use almond milk, coconut milk, oat milk, whole milk, heavy cream, or even a splash of condensed milk. Use whatever you prefer.

How to Make Cacao Tea
Steep for 5 minutes in boiling water. (The longer you steep the stronger the chocolate flavor.) Then sweeten, add a dash of milk, and enjoy!

Tips To Nail the Recipe
- The longer you steep the tea, the more intense the chocolate flavor.
- Do not use cocoa powder as a substitute for cacao; that's hot cocoa. It won't have the same nutritional value.
- Enjoy this drink fresh for the best results.
Variations
- COCAO NIBS TEA. Use this for a sharper chocolate taste that is more tart.
- MORE SPICES. Nutmeg, star anise, and bay leaves add an aromatic quality to this hot drink.
- ICED TEA. Refrigerate the tea after steeping to make iced cacao tea.
FAQs
What is the difference between a cacao husk and cacao nibs?
The husk is the outer shell of the cacao bean whereas the nibs are the crumbled bits of the cacao bean. The husk has a sweeter, delicate flavor while the nibs boost a stronger chocolate taste that is sometimes bitter. You can use either to make this cacao tea recipe.
Does cacao tea contain caffeine?
Cacao husks are caffeine-free. However, they contain theobromine, a natural substance that enhances focus but keeps you calm for more relaxed energy than coffee.
Does cacao tea help you sleep?
Although it has relaxing qualities thanks to the theobromine, this drink is not a sleep aid.

I Hope You Enjoy This Cacao Tea Recipe!
If you try the recipe, don’t forget to rate the recipe and let me know what you think in the comments. Leave a quick review & star rating ★ below! Take pictures and share them with me on Instagram, Facebook, and Pinterest! I love seeing my recipes come to life in your kitchen.
More Healthy Drink Recipes To Try!
Cacao Tea

Cacao Tea is a naturally sweet, chocolate tea that is both energizing and nutritious. Enjoy this quick and easy 2-ingredient hot tea that's ready in just 5 minutes. (This recipe is gluten-free, vegan, and refined sugar-free.)
- 2 tsp Cacao Husk (can use cacao nibs)
- 9 oz Boiled Water
OPTIONAL ADD-INS
- pinch Cinnamon
- 1-2 tsp Agave syrup
- 1 tbsp Milk of choice (plus more to taste)
- Steep for 5 minutes in boiling water. (The longer you steep the stronger the chocolate flavor.)
- Sweeten, add a dash of milk, and enjoy!
Cherimoya Smoothie (Easy and Delicious!)
This cherimoya smoothie is a sweet, refreshing blend of creamy cherimoya fruit, pineapple chunks, agave, and your choice of non-dairy milk. Enjoy this tropical fruit smoothie as a healthy beverage for any time of the day! (This recipe is gluten-free, vegan, and refined sugar-free!)
For another healthy smoothie recipe, try this Fresh Soursop Smoothie, or this super-hydrating Cherry Smoothie!

A cherimoya smoothie is the perfect introduction to this unique tropical fruit. The first time I came across cherimoya, I was at a farmers market in Peru. Initially, I was struck by the vibrant green, heart-shaped, scaly exterior of the fruit but when I sliced it open to eat the sweet, creamy flesh, I was addicted.
The cherimoya fruit has a custard-like texture with a light, fruity, almost vanilla-like flavor. Its mellow flavor pairs perfectly with the ultra-sweet, tart flavor of pineapple. Your taste buds are in for a real treat!
Reasons This Cherimoya Smoothie Recipe Works
- Easy! Slice and deseed your fruit, then add everything to a blender and enjoy!
- Unique! If you're a smoothie lover but bored with the same old smoothie recipes, you have to try this. Once you get your hands on cherimoya, you'll realize there is no other fruit quite like it.
- Customizable! Add fruits, sweeteners, and your choice of milk in order to make this recipe your own.

What is Cherimoya?
Cherimoya (chirimuya or chirimoya), known as custard apple in English, is a tropical fruit that is native to South America. The famous author, Mark Twain, once referred to it as, "the most delicious fruit known to men."
Although it has origins in South America (specifically Ecuador, Peru, and Bolivia), this heart-shaped fruit has variations across the globe, from the Caribbean to Southeast Asia. In Puerto Rico, it's known as guanabana, atis in the Philippines, and srikaya in Indonesia.
Cherimoya is in the Annonaceae family, which includes atemoya (popular in Taiwan) and soursop (popular in Jamaica).
Benefits of Cherimoya
Rich in Antioxidants
Cherimoya contains vitamin C, which protects cells from the potential damage of free radicals. This reduces the risk of developing chronic illnesses, like cancer and heart disease.
High in Fiber
This fiber-rich fruit can ease symptoms of constipation and regulate the digestive system for more regular bowel movements and good digestion.
Supports the Immune System
The vitamin C in cherimoya also supports the immune system, aiding in fighting off infections and disease. It also helps to ease symptoms of the common cold.
Natural Mood Booster
It has been alleged that cherimoya was used as an aphrodisiac by the Incas in the Andes Mountains of South America. While there aren't extensive studies on this, cherimoya does have high levels of vitamin B6, which boosts levels of serotonin and dopamine (mood regulators).

Cherimoya Smoothie Ingredients
- Cherimoya: Remove the seeds and skin.
- Frozen Pineapple Chunks: Using frozen pineapples provides a thicker texture without adding ice.
- Agave Syrup or Honey: Use a natural sweetener instead of sugar.
- Non-Dairy Milk: You can use almond milk, oat milk another plant-based drink of your choice. Light canned coconut milk is a tasty alternative.

Where can I find Cherimoya?
Find cherimoya at international grocery stores and farmers' markets. If you can't find them at your local market, there are plenty of online retailers that can ship them directly to you.
Check out this Pin Story for More Fun Cherimoya Facts!
How to Make a Cherimoya Smoothie
COMBINE. Combine all the ingredients into a high-powered blender and blend until smooth.
ADJUST. If your smoothie is thicker than you’d like, add more non-dairy milk. If you would like your smoothie thicker, add ice, until you reach your desired consistency.

Tips To Nail the Recipe
- Wondering how to cut a cherimoya? Rinse the fruit, cut it in half, and scoop out the creamy flesh.
- Remember to remove cherimoya seeds and skin before adding them to the blender.
- Fresh cherimoyas that are ripe have a very short shelf life so use them within two days.
Variations
- ADD MORE FRUITS. Add banana, papaya, orange, or kiwi to the smoothie for a more tropical flavor.
- CHERIMOYA SMOOTHIE BOWLS. Use this smoothie as the base for a nutritious morning bowl.
- ADD SPICES. For depth of flavor and an interesting twist, add a warm spice like ginger or nutmeg.
- TEXTURE. Want an even creamier smoothie? Use coconut cream instead of another non-dairy milk.
Storage
Pour the leftover cherimoya smoothie into an airtight jar and refrigerate for up to 24 hours.
FAQs
How do you tell if a cherimoya is ripe?
Ripe cherimoya begins to brown slightly on the exterior. It's also soft to the touch.
What does cherimoya taste like?
Although taste is subjective, cherimoya has been described as fruity, with a delicate sweetness, and floral notes. It has been compared to other tropical fruits like banana, pineapple, mangos, and papaya but the overall flavor is truly unique.
Why can't you eat cherimoya seeds?
Ingesting cherimoya seeds is not recommended because they are toxic. When crushed, the large black seeds have even been used as a natural insecticide.
How do you eat cherimoya?
Eating cherimoya is such a pleasant experience. When ripe, you can scoop it out and eat it with a spoon (just avoid the seeds). It's that creamy! Chop it up and add it to salad, use it as the fruit filling for baked goods and desserts, cocktails, and of course, use it to make blended drinks!

I Hope You Enjoy This Easy Cherimoya Smoothie Recipe!
If you try the recipe, don’t forget to rate the recipe, and let me know what you think in the comments. Leave a quick review & star rating ★ below!
More Healthy Drink Recipes!
Cherimoya Smoothie

This cherimoya smoothie is a sweet, refreshing blend of creamy cherimoya fruit, pineapple chunks, agave, and your choice of non-dairy milk. Enjoy this tropical fruit smoothie as a healthy beverage for any time of the day! (This recipe is gluten-free, vegetarian, refined sugar-free, and easy to make vegan!)
- ½ Cherimoya, seeds and skin removed, plus more as desired ((about 1.5 cups cherimoya flesh))
- 2 cups Frozen Pineapple Chunks
- 1 tbsp Agave Syrup or Honey
- 1 cup Non-Dairy Milk of choice, plus more as needed (or light canned coconut milk)
- Combine all the ingredients into a high-powered blender and blend until smooth.
- If your smoothie is thicker than you’d like, add more non-dairy milk. If you would like your smoothie thicker, add ice, until you reach your desired consistency.
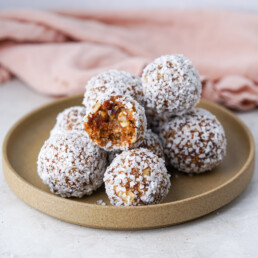
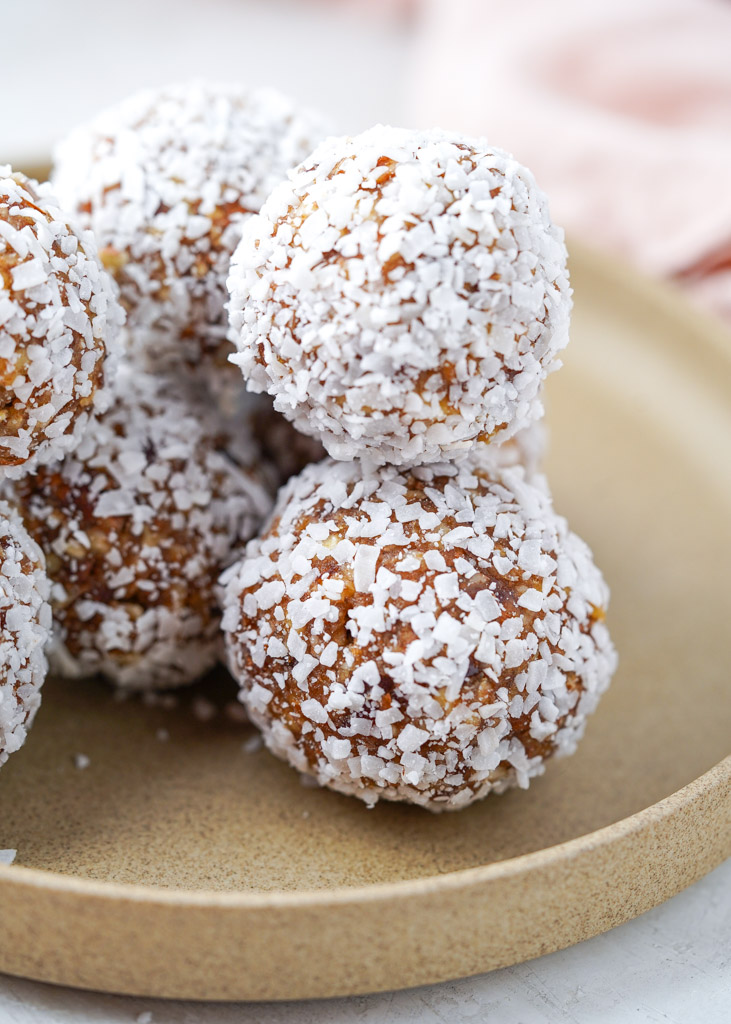
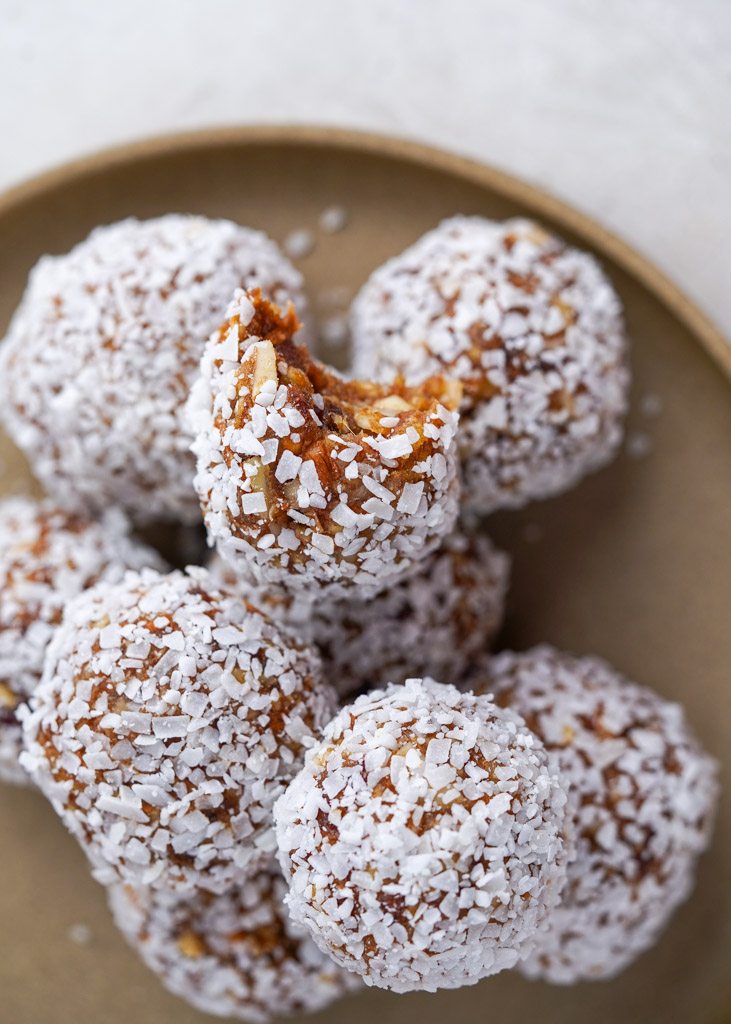
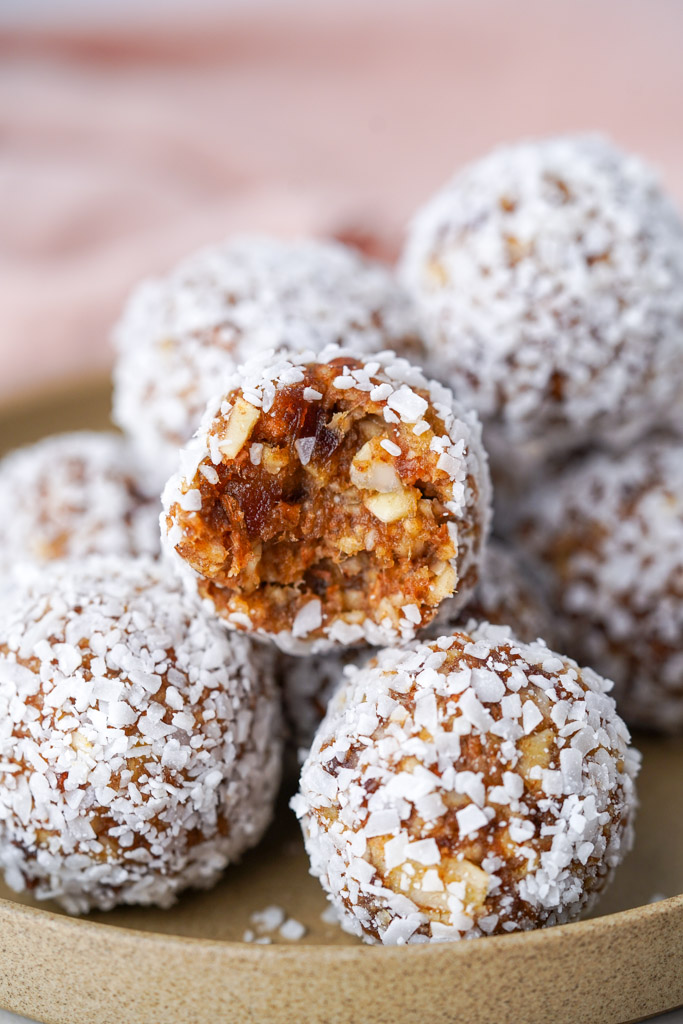
Best Date Energy Balls Recipe (4 ingredients)
These 4-ingredient date balls are packed with a deliciously sweet, nutty flavor and coated in tasty coconut. No-bake date energy balls are a quick, easy, healthy snack with just 20 minutes of prep time and perfect for a healthy, energizing snack. (This recipe is gluten-free, vegan, whole30, paleo, and refined sugar-free.)
For more healthy, delicious snacks, try our Frozen Yogurt Bark recipe next!
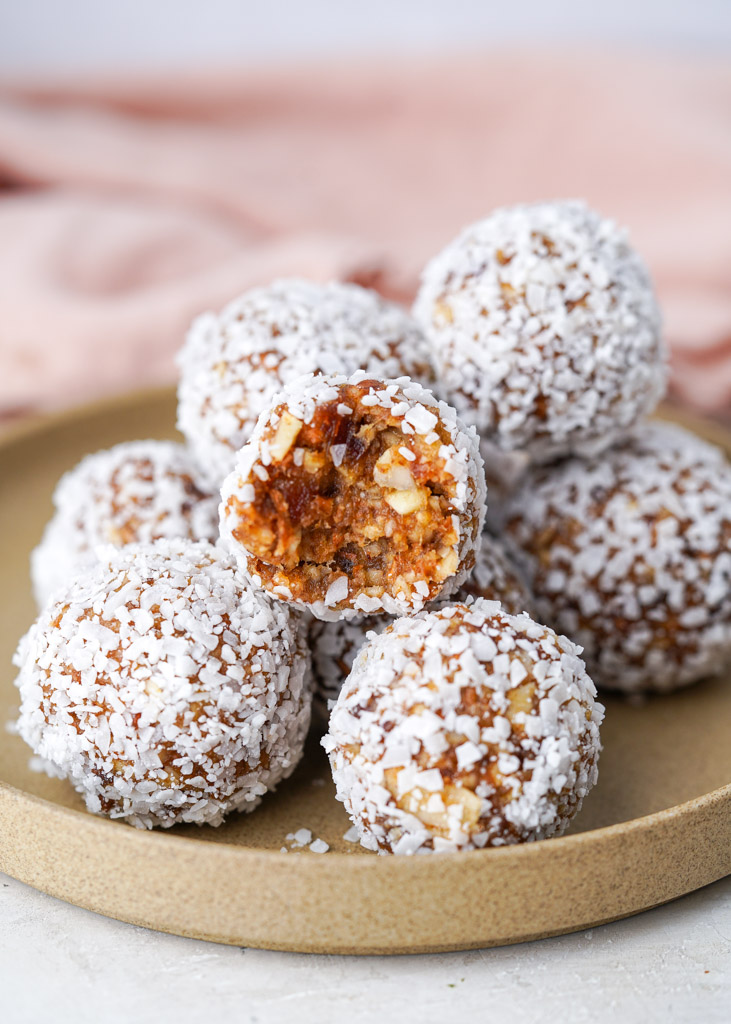
Date balls are a chewy, nutty treat that will satisfy your sweet tooth, made with absolutely no sugar! How is this possible? Dates are dried fruit and a natural sweetener with a caramel-like taste and consistency. When blended with raw pecans and sliced almonds, and then rolled in finely ground coconut, this healthy date ball recipe is absolutely delicious and so satisfying! It will quickly become your favorite go-to snack!
Reasons This Date Energy Balls Recipe Works
- Quick & Easy! Learn how to make energy balls with dates with just a few simple instructions and a handful of wholesome ingredients.
- Healthy Snack! Coconut date balls are packed with fiber and antioxidants so you can indulge guilt-free.
- Better than Energy Bars! Save money with this healthier option that can be modified to suit your taste buds.
5 Health Benefits of Dates
Improves Digestion
Dates are a good source of fiber, which promotes regular bowel movements and prevents constipation. When the digestive system is working properly, the body better absorbs nutrients, improving both the liver and kidneys. This in turn detoxifies the body.
Boosts Brain Health
Regularly consuming dates improves brain function and reduces the risk of Alzheimer's. The antioxidants in dates have also been proven to reduce inflammation throughout the body, including the brain.
Reduces Labor Time
The fatty acids in dates promote the production of prostaglandins, lipids that encourage pregnancy contractions. This lowers the need for induced labor and may also reduce labor time, for easier natural labor.
Natural Energy Booster
With high levels of potassium and fruit sugar, dates are an excellent way to refuel your body, first thing in the morning. Consume them before a workout for more energy. Dates stimulate the metabolism, also promoting weight loss.
A Great Diabetic Snack
The fiber found in dates allows the body to absorb carbs at a slower rate, which people with diabetes need. Dates reduce blood sugar, which makes it a healthier snack for those living with diabetes.
Ingredients You’ll Need
- Medjool Dates: Remove the pits, soak them for 10 minutes so they can soften, and then drain them.
- Raw Pecans: This healthy fat is also a plant-based protein, known to boost energy.
- Sliced Almonds: Almonds are low in carbs and packed with both protein and fiber.
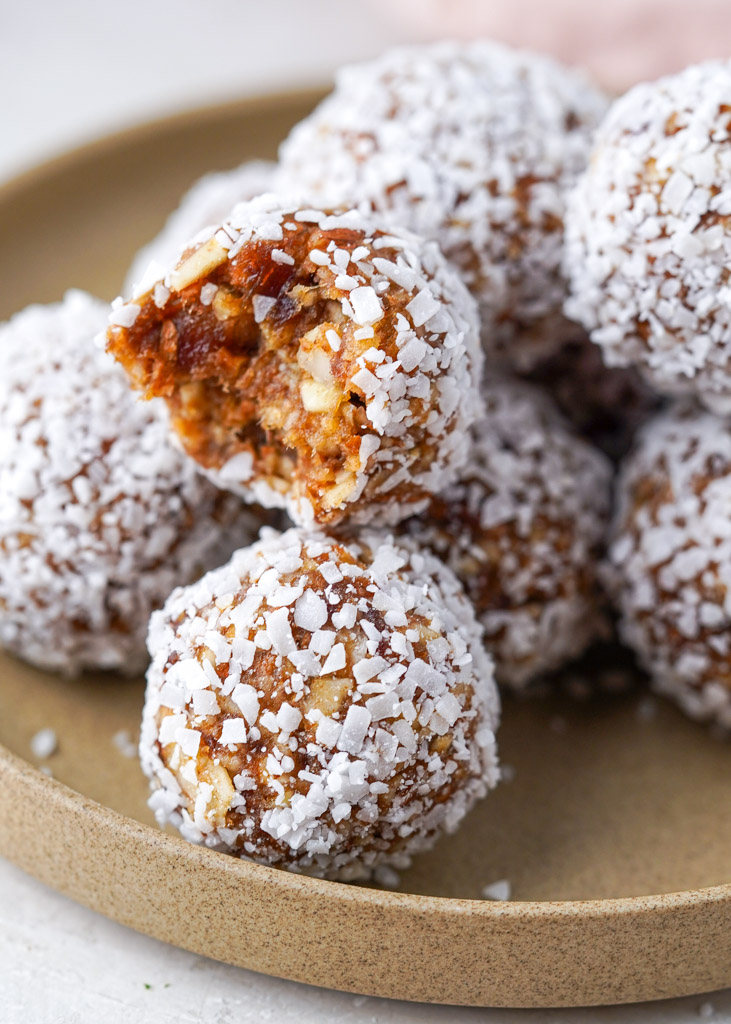
- Desiccated Coconut: Desiccated coconut is finely ground coconut, rather than a bigger strip, and is usually drier than shredded coconut. Feel free to use shredded coconut it that is what you have available. It is a good idea to pulse it in the food processor first to break into smaller pieces.
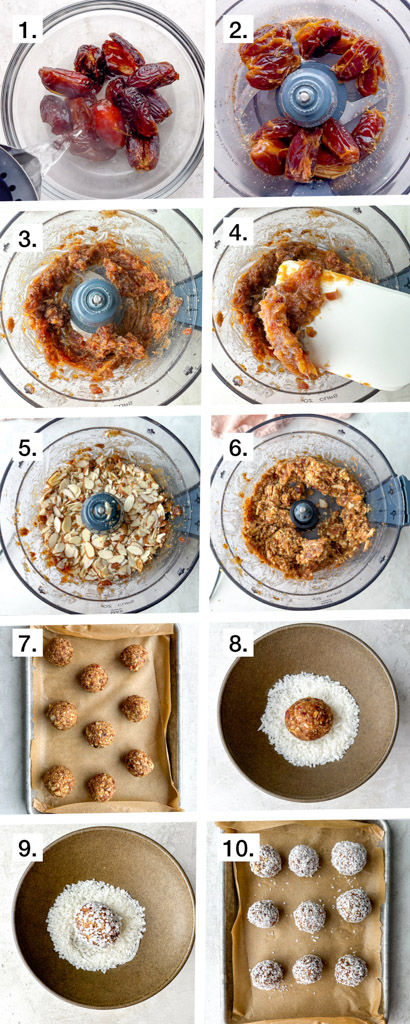
How to Make Date Balls
- SOAK DATES. Remove the pits from the Medjool dates and put them in warm water for 10 minutes to make them soft and easier to blend.
- BLEND PECANS. Place the pecans in the food processor and pulse until broken into smaller pieces. Transfer to a bowl and set aside.
- BLEND DATES. Put the pitted dates in a food processor or blender. Blend on high until it becomes a thick mixture that feels sticky.
- COMBINE PECANS, DATES & ALMONDS. Add the pecans and almonds. Blend until the nuts are incorporated into the date paste.
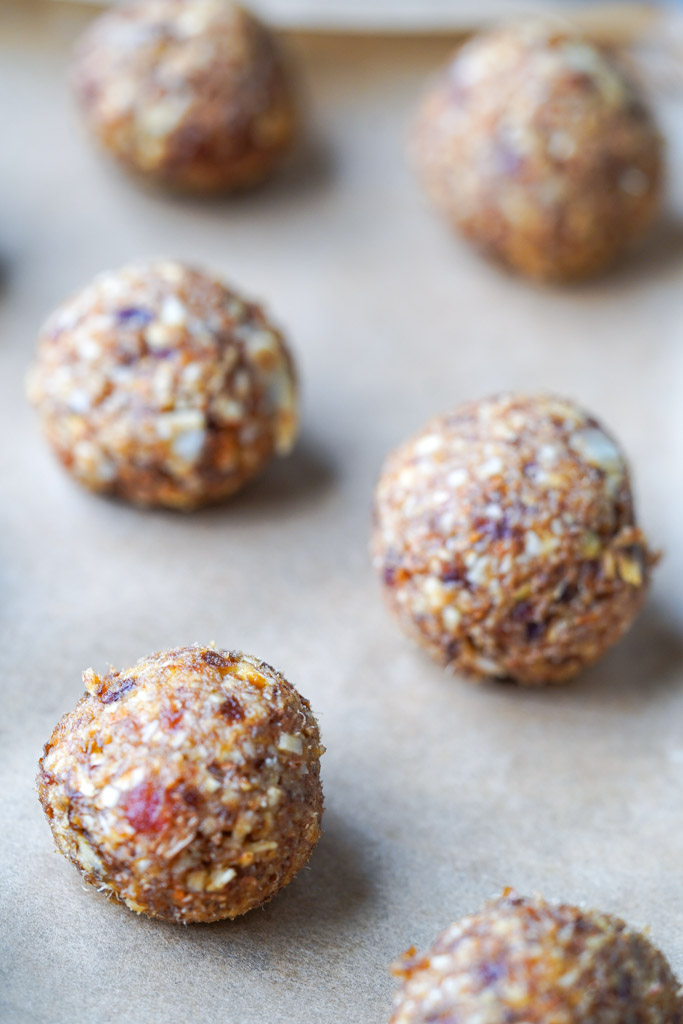
- FORM DATE BALLS. Take about 1-2 tablespoons of the mixture and use your hands to shape it into a ball. Transfer the balls onto a parchment paper-lined baking sheet and place in the fridge for 10 minutes.
- ROLL BALLS IN COCONUT. Roll the energy bites in coconut flakes by pressing them gently. You should have around 9-12 date energy bites (depending on the size). Finally, enjoy!
Tips To Nail the Recipe
- Soak the dates so that they are easier to blend and create a sticky paste.
- You can grind shredded coconut yourself to make the pieces smaller.
- If you do not have a food processor, use a high-power blender instead. However, you may need to blend in batches.
- If the date balls are too dry, incorporate more dates or another sticky ingredient that can act as an adhesive (i.e., honey, nut butters). And if it is too wet, use more dry ingredients.
- Do not skip the chilling process because this makes it easier to roll the balls in the coconut.
Variations
- Want chocolate date balls? Roll the balls in melted chocolate and set them in the fridge. Alternatively, add chocolate chips to the mix.
- Want the date balls to be sweeter? You don't have to add sugar, maple syrup, or agave. Instead, blend the Medjool dates with dried apricot for an even sweeter treat.
- Try walnuts or cashews for a boost of omega-3 fatty acids. Add any of your favorite nuts to taste. You can even use nut butter if you prefer. Almond butter or peanut butter are great options.
- To make it heartier, add rolled oats when blending.
- Whether you have a nut allergy or just don't like nuts, replace them with seeds for date balls without nuts. I suggest sunflower seeds, hemp seeds, chia seeds, or pumpkin seeds.
- If you aren't using salted nuts, add a pinch of salt for a salty-sweet flavor combination.
- Add spices like cinnamon, cardamom, and ginger for a warm flavor. Use vanilla extract or almond extract for even more flavor.
Storage
Store date balls in an airtight container in the fridge for up to 2 weeks. For longer storage, freeze them for up to 3 months. Allow them to thaw overnight in the refrigerator before enjoying.

FAQs
Are date energy balls healthy?
Date balls are a nutritious snack with many health benefits. When consumed in moderation, they can be part of a healthy balanced diet. Be mindful of how you customize them and what ingredients you include because dates are already high in calories.
What are date balls made of?
This recipe includes dates and nuts. Some date ball recipes include nut butter, seeds, protein powder, dried fruits, or chocolate.
What is the ratio for date energy balls?
For every 10 dates, use 2 cups of your preferred nuts.
I Hope You Enjoy This Date Energy Balls Recipe!
If you try the recipe, don’t forget to rate the recipe, and let me know what you think in the comments. Leave a quick review & star rating ★ below!
Best Date Energy Balls Recipe

These 4-ingredient date balls are packed with a deliciously nutty flavor and restore your energy. No-bake date energy balls are a quick, easy, healthy snack with just 20 minutes of prep time. (This recipe is gluten-free, vegan, whole30, paleo, and refined sugar-free.)
- 10-12 Medjool Dates (pits removed, soaked, and drained)
- 1 cup Raw Pecans
- 1 cup Sliced Almonds
- ½ cup Desiccated Coconut
- Remove the pits from the medjool dates and put them in warm water for 10 minutes to make them soft and easier to blend.
- Put the pitted dates in a food processor or blender. Blend on high until it becomes a thick mixture that feels sticky.
- Add the pecans and almonds. Blend until the nuts breakdown and are incorporated into the date paste.
- Take about 1-2 tablespoons of the mixture and use your hands to shape it into a ball. Transfer the balls onto a parchment paper-lined baking sheet and place in the fridge for 10 minutes.
- Roll the energy bites in coconut flakes by pressing them gently. You should have around 9-12 date energy bites. Enjoy!

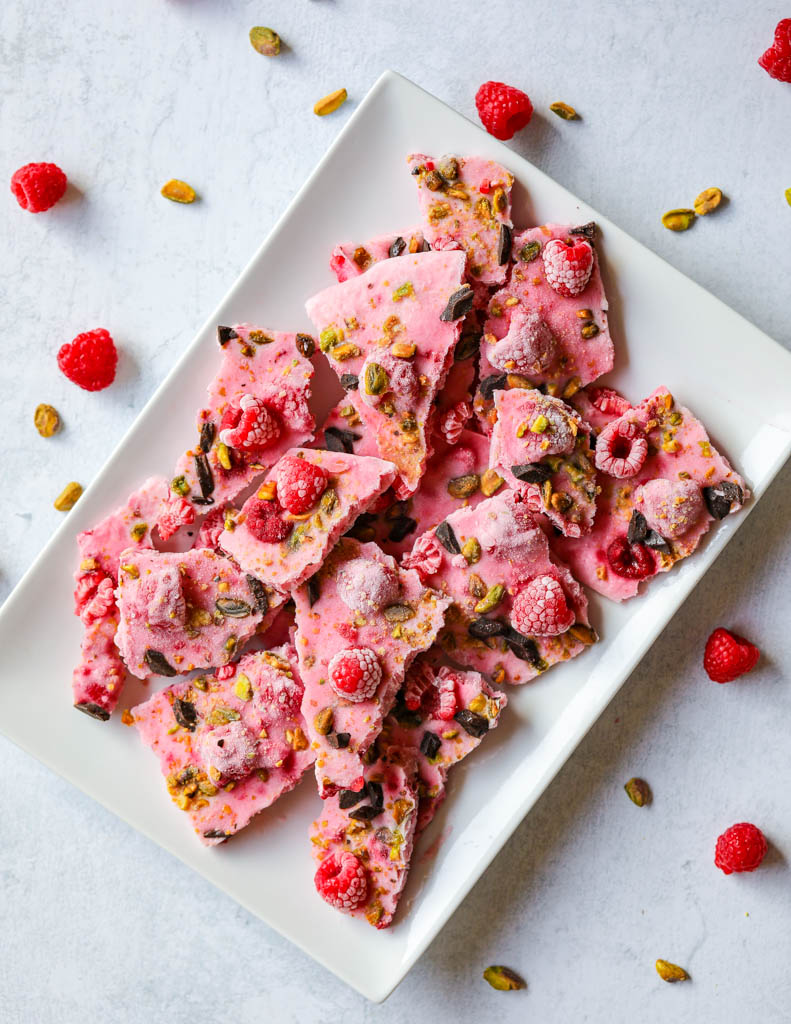
Frozen Yogurt Bark
This Frozen Yogurt Bark recipe is a delightful and refreshing treat for breakfast or as a snack straight from the freezer! It's a great way to enjoy protein-rich yogurt with delicious and nutritious additions, including sea moss gel! (This recipe is Gluten-Free, Dairy-Free, Vegan, and can be made Paleo/Whole30!)
Yogurt, raspberries, chocolate, and pistachios combine in this yogurt bark recipe for a healthy snack, breakfast, or even a charcuterie board addition! Plus you can enjoy this bark with various berries, nuts, and types of yogurt to tailor it to your liking!

Reasons This Yogurt Bark Recipe Works
- Simple Ingredients and Steps! This is a perfect recipe to share with kids to get them into the kitchen, and it only has 7 healthy ingredients!
- Easily Customizable! Nearly every ingredient can be swapped to your preferences, or what you have on hand in your home. For example, switch pistachios for almonds or other nuts, raspberries for your favorite berry (strawberries + chocolate is a classic combo!), and use honey or maple syrup instead of agave.
- Fulfills Your Fro-Yo Cravings! A homemade, low-sugar way to eat frozen yogurt - what could be better? With this recipe, you get all the goodness you want without sacrificing nutrient-density.
Ingredients You'll Need
- Non-dairy Yogurt: Of course, you need yogurt for frozen yogurt bark as it provides the creamy base for this recipe! You can choose your favorite, but I recommend cashew yogurt for a high dose of protein and minerals. Dairy-free yogurts vary but most contain a good amount of protein and healthy fats. Choose a flavored yogurt if you want to make a variation of this bark!
- Agave Syrup: Low on the glycemic index, agave syrup provides a natural sweetness to these yogurt bars! High quality agave syrup contains phytonutrients that can produce an antioxidant effect.
- Sea Moss Gel: This nutrient-dense ingredient is, of course, one of my favorite ways to get a lot of nutrition into my recipes! Adding Sea Moss Gel is totally optional!
- Vanilla Extract: A pantry staple for any fan of sweet treats, vanilla extract and vanilla bean may offer a good source of antioxidant and anti-inflammatory properties as well as possibly benefiting brain health!
- Raspberries: Frozen raspberries and fresh raspberries alike are sweet but tart berries contain potassium, omega-3s, and manganese.
- Cacao Nibs or Dark Chocolate Chips: Choose your favorite or use both! Cacao nibs contain healthy fats and can increase feel-good hormones such as serotonin and dopamine. Dark chocolate has antioxidant benefits, improves brain function and blood flow!
- Pistachios: This mild, almost creamy-flavored nut contains lots of fiber, minerals, and unsaturated fat! It also contains gut-healthy fiber and plant protein, perfect for boosting your energy levels.
How To Make Frozen Yogurt Bars
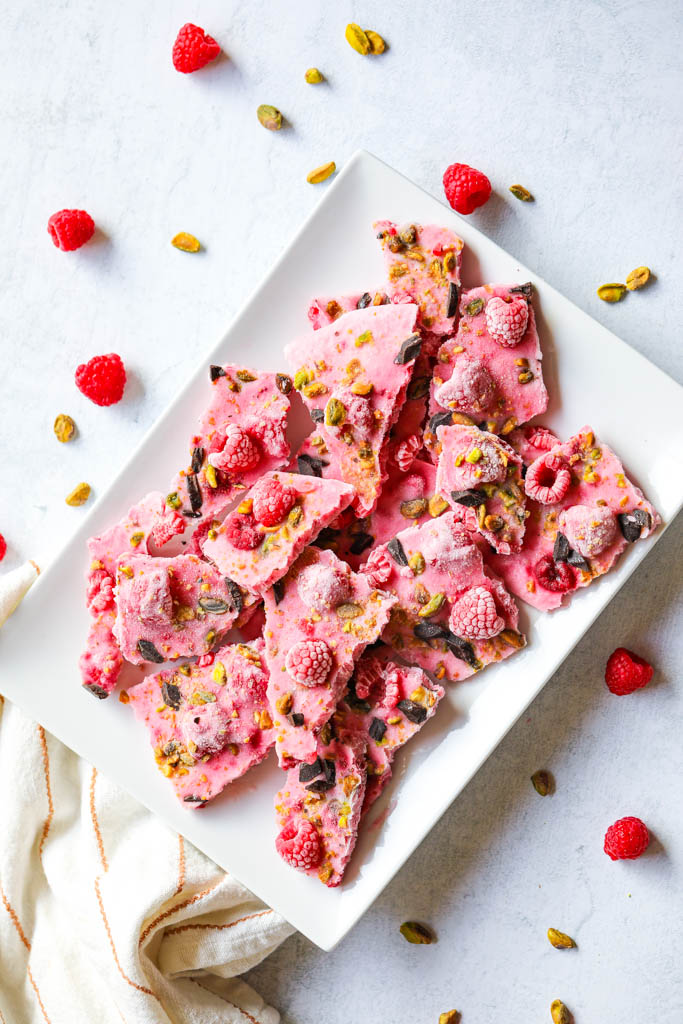
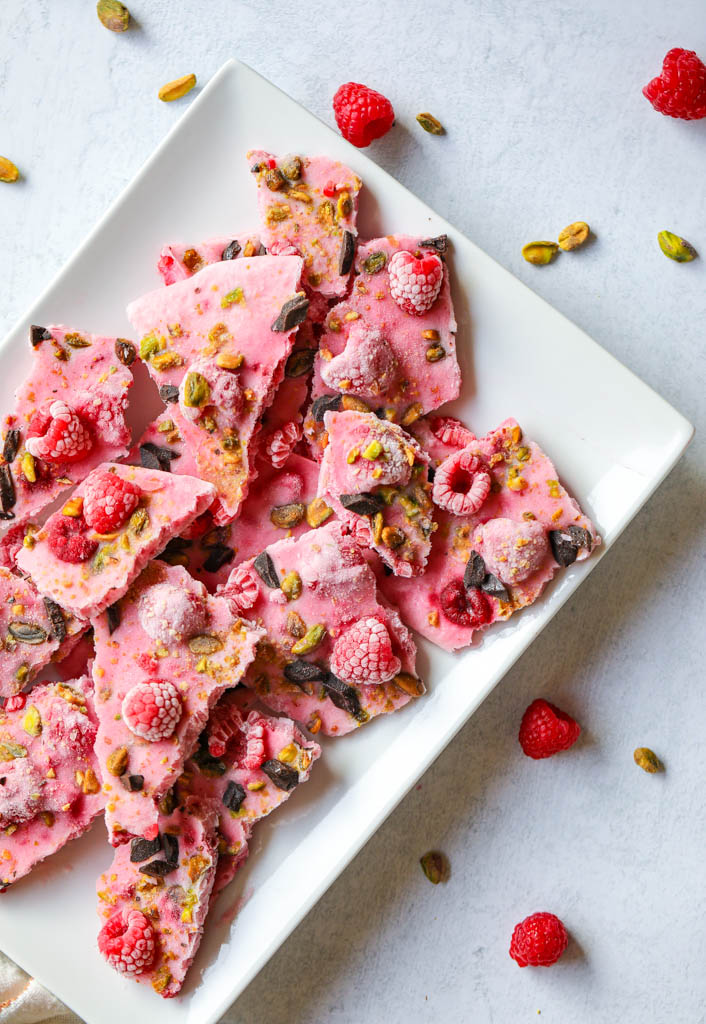
Cover a rimmed baking sheet or sheet pan with parchment paper. In a large bowl, combine yogurt, raspberries, vanilla extract, sea moss gel, and agave syrup. Then add in raspberries and mix. Spread yogurt mixture onto a baking sheet to about 1/4" thickness and top with pistachios, cacao nibs or chocolate chips, and more raspberries. Freeze for at least 4 hours or overnight, then break apart and enjoy!
Tips To Nail The Recipe
- To create the pink color shown in the photos, smash raspberries into the yogurt mixture before adding toppings.
- Use flavored yogurt to boost the fruity flavor of this treat!
- Stir in a favorite superfood powder such as chaga mushroom powder, ashwagandha powder, or moringa powder! Mix into the yogurt before adding other ingredients for a smooth texture.
- Store leftover yogurt bark for up to 1 month in your freezer! Simply wrap in parchment paper and place it in a freezer-safe bag.
Recipe Variations and Customization
- Try Different Nuts! Use almonds, walnuts, pecans, to vary the recipe.
- Use a Different Type of Fruit! Blueberries, strawberries, blackberries, and even dried goji or dried acai berries would all be delicious in this recipe. Mango would also be a yummy variation to top with coconut flakes for a tropical treat!
- Add Nut Butter! Swirl your favorite nut butter (almond butter, sunflower butter cashew butter, and peanut butter all work well) into the yogurt mixture on the pan before topping. The bark will taste like a PB & J that kids will love!
- Paleo? Make this recipe Whole30 friendly by omitting the agave syrup.
- Nut Free? Sprinkle the top with your favorite granola, rolled oats, sunflower seeds or pumpkin seeds rather than pistachio to add a bit of crunch!

FAQs
Can I use a different type of yogurt in this recipe?
Yes! Choose whichever dairy-free yogurt (or Greek yogurt if you eat dairy) you prefer, and flavored yogurts work too! If you want to boost your calcium, find a fortified yogurt!
How Do I Store Frozen Yogurt Bark?
If you have any leftovers, put them back into the freezer for up to 1 month. Simply wrap in the parchment paper and put it into a freezer-safe bag.
Is Frozen Yogurt Bark Healthy?
Yes, this creamy and delicious treat is healthy The yogurt bark ingredients are nutrient-dense and low in saturated fat, cholesterol, and processed junk! If you're watching sugar, choose a low-sugar yogurt and opt for cacao nibs.
I Hope You Enjoy This Frozen Yogurt Bark Recipe!
If you try the recipe, don’t forget to rate the recipe and let me know what you think in the comments. Leave a quick review & star rating ★ below!
Frozen Yogurt Bark

This Frozen Yogurt Bark is a sweet treat to start your day or a tasty snack between meals! The combination of raspberry, pistachio, and chocolate is heavenly, and you may just eat it all at once!
- 2 cups Non-Dairy Yogurt (like cashew or coconut yogurt)
- 2 tbsp Agave Syrup
- 1-2 tbsp Sea Moss Gel (optional)
- 1 tsp Vanilla Extract
- 2/3 cup Raspberries (fresh or frozen) (plus more for topping)
- 2 tbsp Cacao Nibs or Dark Chocolate Chips
- 1/3 cup Pistachios (finely chopped)
- Line a rimmed baking sheet with parchment paper and set aside.
- In a large bowl, combine the yogurt, agave syrup, sea moss gel, and vanilla. Add in the raspberries and stir until combined.
- Pour the mixture onto the lined baking sheet and spread until about 1/4" thick.
- Top with pistachios, cacao nibs (or dark chocolate chips), and more raspberries.
- Transfer to the freezer and freeze for at least 4 hours or overnight, until firm.
- Remove the bark from the freezer and break it apart using a knife or your hands.
- Enjoy a few pieces for breakfast, dessert, or as a snack.
- Store any remaining yogurt bark in an airtight container in the freezer.
Tip: To get the pink color, mash a few raspberries and mix them into the yogurt until the yogurt turns pink.

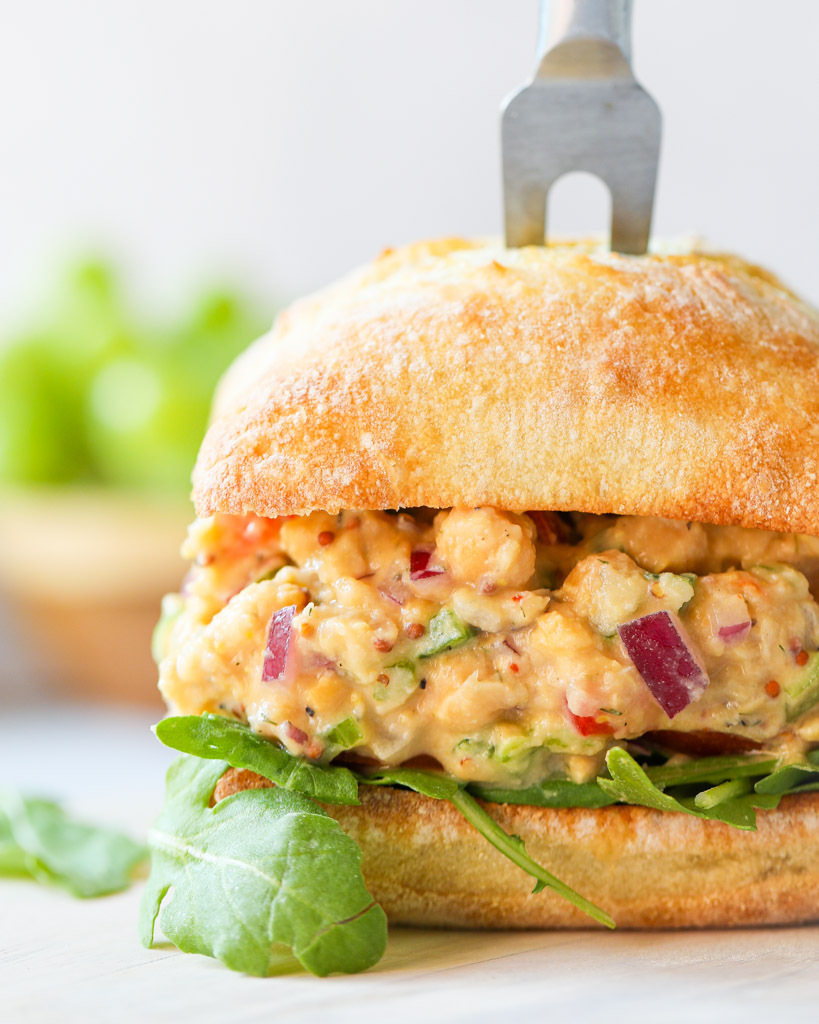
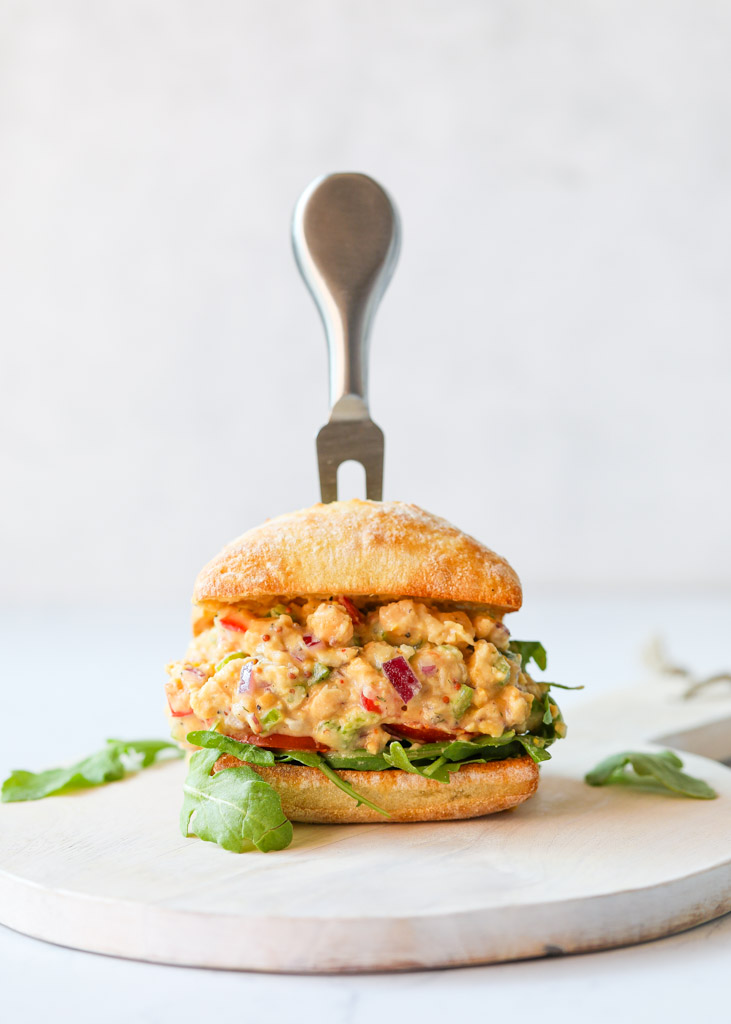
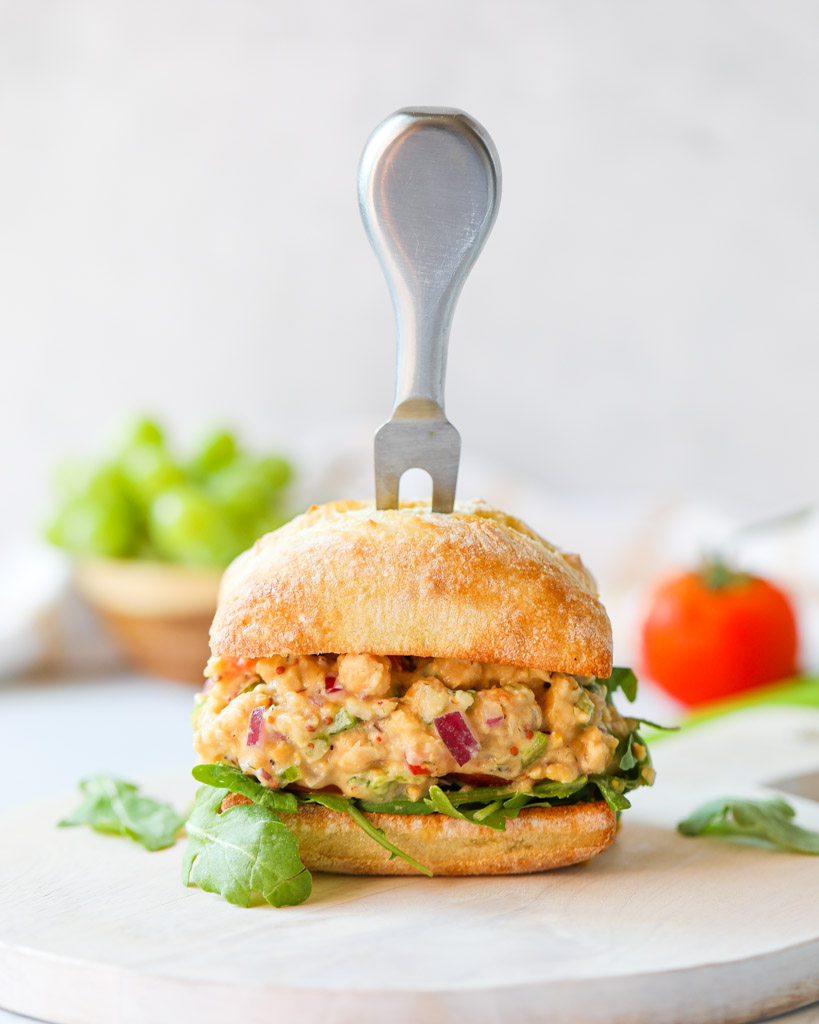
Vegan Chickpea Salad Sandwich
This chickpea salad sandwich is a creamy mix of smashed chickpeas, herbs, and spices. Serve this savory mixture between two slices of bread or in a wrap as a vegan alternative to tuna salad or chicken salad. (This recipe is gluten-free, dairy-free, and vegan.)

This chickpea salad sandwich is the sandwich of my dreams! It’s jam-packed with flavor, super filling, and absolutely mouthwatering. I like to enjoy it for lunch with sliced veggies, homemade sweet potato fries, or potato chips. Paired with Refreshing Cucumber Apple Juice, this is the ultimate meal for lunch!
Reasons This Chickpea Salad Sandwich Recipe Works
- A Healthy Meal! Enjoy a meatless meal that still provides plenty of fiber and protein.
- So Delicious! This vegan chickpea salad sandwich is definitely not bland. It's bursting with flavor and texture from mashed chickpeas, zesty Dijon mustard, and crisp celery.
- Good for Meal Prep! This is easy to prepare and stores well so you can enjoy it for lunch throughout the week.

Chickpea Health Benefits
Chickpeas, also known as garbanzo beans, are a legume packed with nutrients.
Super Filling
Curb your appetite with a food rich in protein and fiber. Both slow digestion, helping you to feel full for longer. This in turn lowers calorie intake, which helps with weight loss and management.
Improves Bone Health
Chickpeas contain calcium and iron, two minerals that strengthen bones and teeth.
Aids Digestion
Chickpeas have soluble fiber which helps to prevent the growth of bad bacteria in the gut and constipation. It also promotes regular bowel movements. Additionally, eating chickpeas regularly can reduce the likelihood of IBS (Irritable Bowel Syndrome) and colon cancer.
Great for Heart Health
Fiber, potassium, and Vitamin B are all found in chickpeas and can lower cholesterol levels. This reduces the risk of heart disease, heart failure, and cardiovascular disease.
Ingredients You’ll Need
- Chickpeas: Rinse and drain the chickpeas before smashing them.
- Celery Stalks: Dice for crunchy bits throughout the sandwich.
- Peppers: I add diced red bell pepper and jalapeño for a kick of spice.
- Basic Cashew Cream: This is the key to a creamy chickpea salad sandwich with no mayo.
- Dijon Mustard: This has a tangy sharp flavor.
- Red Onion: Diced.
- Fresh Lemon Juice: For a touch of bright acidity, add this citrus fruit.
- Dried Dill: Add for a fresh, herby taste.
- Seasoning: I season with garlic powder, salt, and black pepper to taste.
How to Make Chickpea Salad Sandwich
MASH CHICKPEAS. Add rinsed and drained cooked chickpeas to a large bowl. Use a fork or potato masher to mash the chickpeas until you reach your desired consistency.
COMBINE OTHER INGREDIENTS. Add the remaining ingredients to the chickpea mixture and stir until well combined.
SERVE ON BREAD OR IN A WRAP. Enjoy your chickpea salad on sandwich bread or in a wrap with leafy greens and tomato. A good low carb, high protein option is a Cottage Cheese Wrap.
Tips for the Best Chickpea Salad Sandwich
- Remember to rinse the chickpeas before mashing them in order to remove excess sodium.
- You can mash all of the chickpeas or leave about ¼ whole to give the chickpea salad added texture.
- If you don't plan to eat this immediately, store it in the fridge in an airtight container. Add it to bread, a wrap, or serve on a bed of lettuce when you're ready to eat, so the salad doesn't make the other ingredients soggy.
Variations
- Mayonnaise: The cashew cream is a replacement for mayo but you can use vegan mayo instead.
- Tahini: This creamy sesame seed paste is also an excellent option to make creamy chickpea salad without mayo
- Toppings: Add sliced tomatoes, avocados, or pickles.
- Curry: For a curried chickpea salad sandwich, add curry powder to the chickpea mixture. Add raisins for a delicious balance of spicy and sweet flavors.
- Buffalo Chickpea Salad Sandwich: Add your favorite hot sauce directly to the cashew cream or vegan mayo.
- Add Some Crunch: Add crispy chickpeas into your chickpea salad for an added crunchy texture.
Storage
Store any leftover chickpea salad in an airtight container in the fridge for up to three days.
FAQs
Can you eat chickpeas straight from the can to a salad?
Yes. Canned chickpeas are precooked so can be eaten straight from the can.
Why is chickpea salad good for you?
Chickpea is a nutritious addition to a well-balanced diet. It's rich in fiber and protein so it promotes digestion and helps you feel full for longer.
What goes well with chickpeas?
Chickpeas are extremely versatile and can be made with a variety of spices, herbs, and vegetables. They go well with just about anything!
I Hope You Enjoy This Healthy Chickpea Salad Sandwich Recipe!
If you try the recipe, don’t forget to rate the recipe and let me know what you think in the comments. Leave a quick review & star rating ★ below! For more recipes using chickpeas, check out this High-Fiber Salad!
Vegan Chickpea Salad Sandwich

This chickpea salad sandwich is a creamy mix of smashed chickpeas, herbs, and spices. Serve this savory mixture between two slices of bread or in a wrap as a vegan alternative to tuna salad or chicken salad. (This recipe is gluten-free, dairy-free, and vegan.)
- 1 15 oz Can Chickpeas (rinsed and drained)
- 2 Celery Stalks (diced)
- ½ Red Pepper (diced)
- 1 Jalapeño (diced (optional))
- 3 tbsp Basic Cashew Cream ((can sub with tahini or vegan mayo))
- 3 tsp Dijon Mustard
- ¼ Red Onion (diced)
- 1 tbsp Lemon Juice
- ½ tsp Dried Dill
- ½ tsp Garlic Powder
- Salt and Pepper (to taste)
- In a large bowl, add the rinsed and drained cooked chickpeas. Use a fork or potato masher to mash the chickpeas until you reach your desired consistency. You can mash all of the chickpeas or leave about ¼ whole to give the chickpea salad added texture.
- Add the remaining ingredients and mix until well combined.
- Enjoy your chickpea salad on sandwich bread or in a wrap with leafy greens and tomato. Store any leftover chickpea salad in an airtight container in the fridge for up to three days.